
How to Create Printables Without Expensive Software
You want to create beautiful printables but don’t have a clue how to use software like Photoshop or Illustrator. When I first became interested in graphic design, I didn’t have a clue either. Not only did I not have a clue how to use the programs, but I couldn’t afford to buy the software anyway. Today, you’re going to learn how to create printables WITHOUT expensive software. Anyone can do this, I promise.
This post contains affiliate links. You can read my disclosure policy here.
^^^PIN IT SO YOU DON’T FORGET THIS TUTORIAL^^^
What software are we going to use to create printables? PicMonkey. It has a paid version and a free version. Everything you are going to learn today, you can do with the free version.
Who’s ready to start cranking out drool worthy printables? Let’s do this!
CREATE PRINTABLES WITHOUT EXPENSIVE SOFTWARE
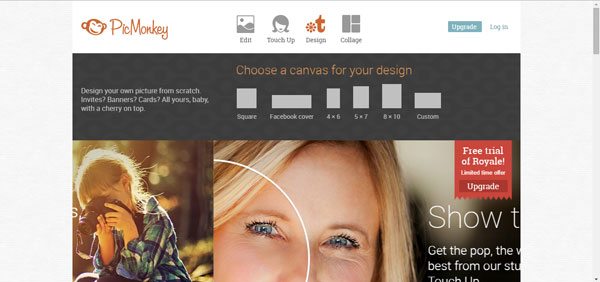
Open PicMonkey at picmonkey.com. At the top, choose “Design” then “8×10”
Today you’re going to learn how to create printable tags that you can use for gifts, cupcake toppers or even stickers. I create LOTS of parties and I use printable tags in all my parties.
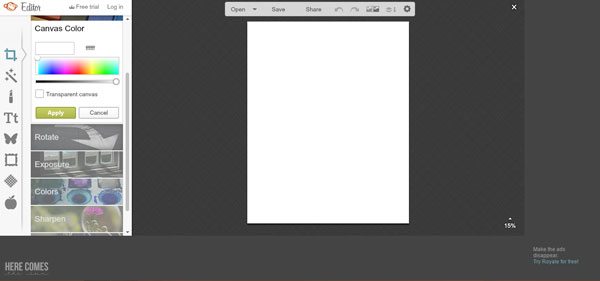
Once you choose “8×10”, this is what you will see.
[clickToTweet tweet=”Want an easy way to create #printables without buying expensive soft ware? Learn how with PicMonkey!” quote=”Want an easy way to create #printables without buying expensive soft ware? Learn how with PicMonkey!”]
On the left hand side, choose Overlay (the butterfly shape) > Geometric > Circle. When you click on the circle, it will appear on your canvas.
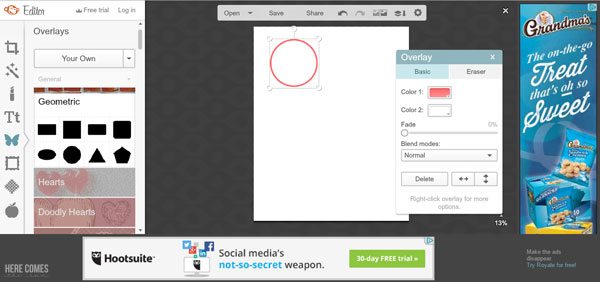
To change the size of your circle, click on the corner and drag.
To change the color of the circle, click the drop-down next to “Color 2” and choose a color.
To change the outline color of the circle, click the drop-down next to “Color 1” and choose a color
I chose a white circle with a pink outline.
When you are satisfied with the size and color of the circle, right click on it and select “Duplicate overlay”
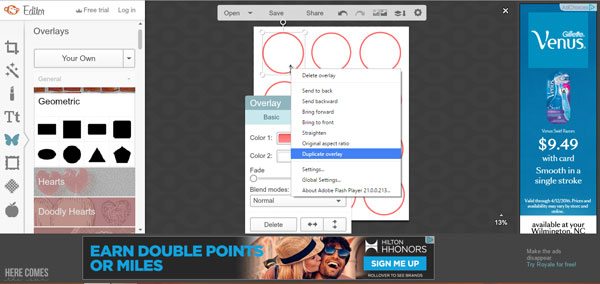
Drag the duplicate next to your original image. Do this several times until you fill up the entire sheet with circles.
Now you’re going to add the text
Click on the text tool on the left side (Tt)
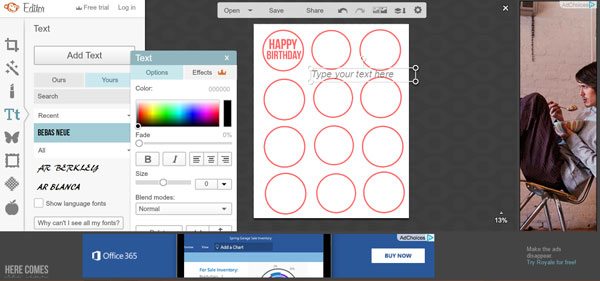
Now here’s what I love. You can use ANY font that you have installed on your computer! If you don’t like the options that PicMonkey has, just click “Yours” at the top and your fonts will be automatically loaded! I chose the Bebas Neue font from my collection. Want access to TONS of amazing fonts? My favorite place for fonts is Creative Market.
Choose your font and click “Add text”
Type your text into the box, resize and move to the center of your tag.
Duplicate your text and move to the center of each tag.
YOU NOW HAVE CREATED A SHEET OF PRINTABLES THAT YOU CAN PRINT OVER AND OVER!
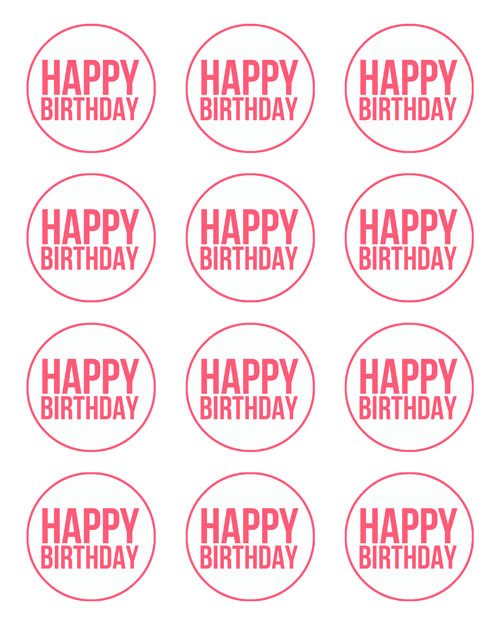
Save the file as a JPG (the option for PDF is not available unfortunately) and send to your local print shop or print at home.
Now that you have created a great sheet of printables, what are you going to use them for?
After you have mastered creating printables in PicMonkey, you’re ready to move up to Photoshop Elements. I’ve got a free eCourse that will teach you the basics that you need to get started.

If this post helped you, I would love it if you would share it using the share buttons below.
Check out all my free printables here.
For some great printable inspiration, check out my Pinterest board.
Can you use Pic Monkey with an item you have scanned into the computer? For example I have a resource sheet that I need to make smaller and make into a sticker.
Yes. PicMonkey allows you to open a file and resize it.
Great post! Thanks!!
Hi Kelly, I have searched for days looking for information on how to use digital clipart images and what programme would be best for a novice. I’m not artistic or computer savvy, but I would like to be able to create invitations using the vast amounts of digital images available. So I wanted to say a huge thanks for this post, I think this will be an excellent starting point.
Thanks again.
You’re welcome, Anne. I’m glad you found it useful.
I’m so glad I found this post! This is just what I needed to get my printables going. Thanks for such informative info. I’ve seen tons of so called”learn how to create printables” but once you click the page is just them selling you somethin with no instructions
Hi Shauna! Thank you so much for your kind words. If you have any questions about creating printables, please don’t hesitate to ask.
This was so helpful, so with using Picmonkey and creative market after you make your designs or templates you are free to sell/ give away the materials you created?
Hi Patricia! In order to sell your designs, you need to be sure that the items that you use (from Creative Market or any other site) are ok to be used commercially. Most designers will require you to purchase a commercial use license to use their products in an item you want to sell. Each designer is different and you will have to check the terms of use for each item that you purchase. Hope this helps.
Thank you so much!!! Love the tutorial and easy to understand.
Kelly,this is great post after digging the internet for weeks I found this website and am finally glad…would you able to guide on sizes for printable like cake toppers, pennants etc. I really want to explore this and learn myself.
Hi Neelam! For cupcake toppers, I usually make 2″ circles. For pennants, you can make them as big or small as you want but I usually either make 1 or 2 triangles per 8.5×11 sheet of paper.
love this! thanks for the great tutorial
Thank you for sharing this post. I have question….If you had to choose a program to use for printable graphics – with experience using Adobe programs – which one would you use? Thanks again.
Hi Toni! When I first started creating printables, I used Photoshop Elements. I offer a free intro ecourse on Photoshop Elements that you can sign up for. Currently, I use Adobe Illustrator.
Been looking for something like this!!! But when I go to PicMonkey it isn’t free….? It only has a week trial or to pay…
Hi Allison. Unfortunately PicMonkey is not free anymore. When I wrote this post, it was free so I’m sorry for the confusion. That being said, PicMonkey is a lot cheaper than other programs such as Illustrator.
Kelly
I would like to learn how to create my own printable party decoration packages to sell. I am not familiar with how to use any of these programs so I would like to chose one program to invest time into learning. Would you recommend Photoshop or Illustrator?
Thanks!
Sara
Hi Sara! Photoshop is easier to learn (in my opinion) but you can do a lot more with Illustrator. I have tutorials on both Photoshop and Illustrator in my graphic design section here: https://kellyleighcreates.com/graphic-design/
I also recommend Photoshop Elements which is what I started out with when I first started designing party invitations and decor. There are Photoshop Elements tutorials in my graphic design section as well. I also have an ebook for sale on how to use Photoshop Elements for graphic design. You can find out more about the book here: https://kellyleighcreates.com/photoshopelements/
Hope this helps
I want to ask something and if anyone knows for sure just let me know… I want to create my own printables to sell. If I use illustrator, pic monkey or anything similar and their templates, am I legally ok to sell what I create? Thank you… ❤️
Irene,
A site like PicMonkey usually has specific terms of use regarding what you can and can’t do with the items you create. I would make sure to read the terms of use and email them if you have any questions. For a program like Illustrator, you can sell what you create unless you incorporate a design that was not fully created by you. You would need to check with the designer and their terms of use. Hope this makes sense.