
Easy Wood Slice Ornaments
These wood slice ornaments are fun to make and are great gifts!
When I think of wood slice ornaments, I think of using wood burning tools to create intricate designs. Let me tell you a little about my experience with wood burning tools…I had some tools when I was a kid and I don’t remember anything good coming from it. I distinctly remember the smell that stunk up my room for days when I used them. Maybe I was doing it wrong…maybe I just didn’t expect the smell…but it really didn’t leave a good impression on me (no pun intended). There are many people that can use these tools to make wonderful designs. I am not one of them. So I make wood slice ornaments the easy way.
WOOD SLICE ORNAMENTS SUPPLIES
- Wood slices
- Heat Transfer Vinyl (HTV)
- Iron or Heat Press
- Silhouette or Cricut
- Weeding Tools
- Drill
- Ribbon
HOW TO MAKE WOOD SLICE ORNAMENTS
These wood slice ornaments are easy to make and no burning involved…unless you go a bit crazy with the iron. Here’s how to make them:
You can find wood slices at most craft stores but if you don’t want to go driving all over town, just get some here. During the holiday season, I am all about shipping things directly to my house, craft supplies included. I can’t stand holiday traffic.
Next, download the cut files. The files that I used for these ornaments are part of my holiday cut file set.
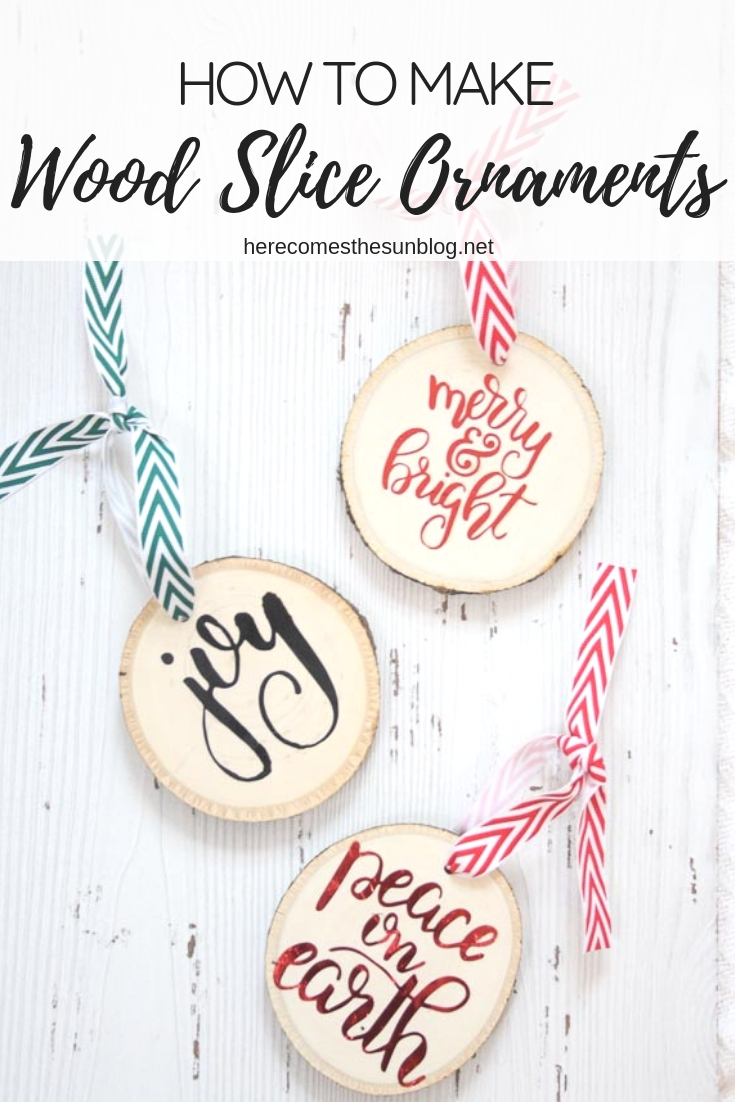
Looking to create a new handmade ornament? Check out these wood slice ornaments!Using your Silhouette or Cricut, cut out the file of your choice onto heat transfer vinyl.Make sure to mirror the cut file before cutting.My favorite heat transfer vinyl is Siser Easyweed. I find that it sticks really well and holds up well in the wash. Although there is no reason to wash these ornaments, I like to use this brand of HTV for all my projects. The photo shown below with the black “JOY” is Siser Easyweed. The red foil looking vinyl is not but I love the look of the red foil.
Once the file is cut, weed out the excess with your weeding tools. The great thing about HTV is that you don’t need transfer tape. The vinyl is stuck to a carrier sheet so all you do is flip it over and iron/heat press.

Center your vinyl design onto the wood slice ornament and place a piece of parchment paper over the vinyl. Iron or heat press for approx. 20 seconds. Do not press down… just place the iron or heat press onto the parchment paper. If you are using an iron, do not use steam. Peel off the carrier sheet to reveal your design
Drill a hole through the top center of the ornament and thread some decorative ribbon through. Or, if you use these wood slices, they come with a predrilled hole AND ribbon saving you lots of time! Now you have beautiful wood slice ornaments for your tree or to give as gifts.
I’ll be selling these ornaments at a local market this year and I’ll also be making a lot for our tree. They are perfect if you are going for a woodland theme which is what we have decided on this year.


LOVE IT? PIN IT!
YOU MAY ALSO LIKE
Felt Candy Ornaments
Perler Bead Ornaments
Peppermint Bath Bomb Ornaments
Felt Snowflake Sachet Ornament
Have you tried infusible ink on wood?
Hi Becky! I have not tried it on wood yet.