
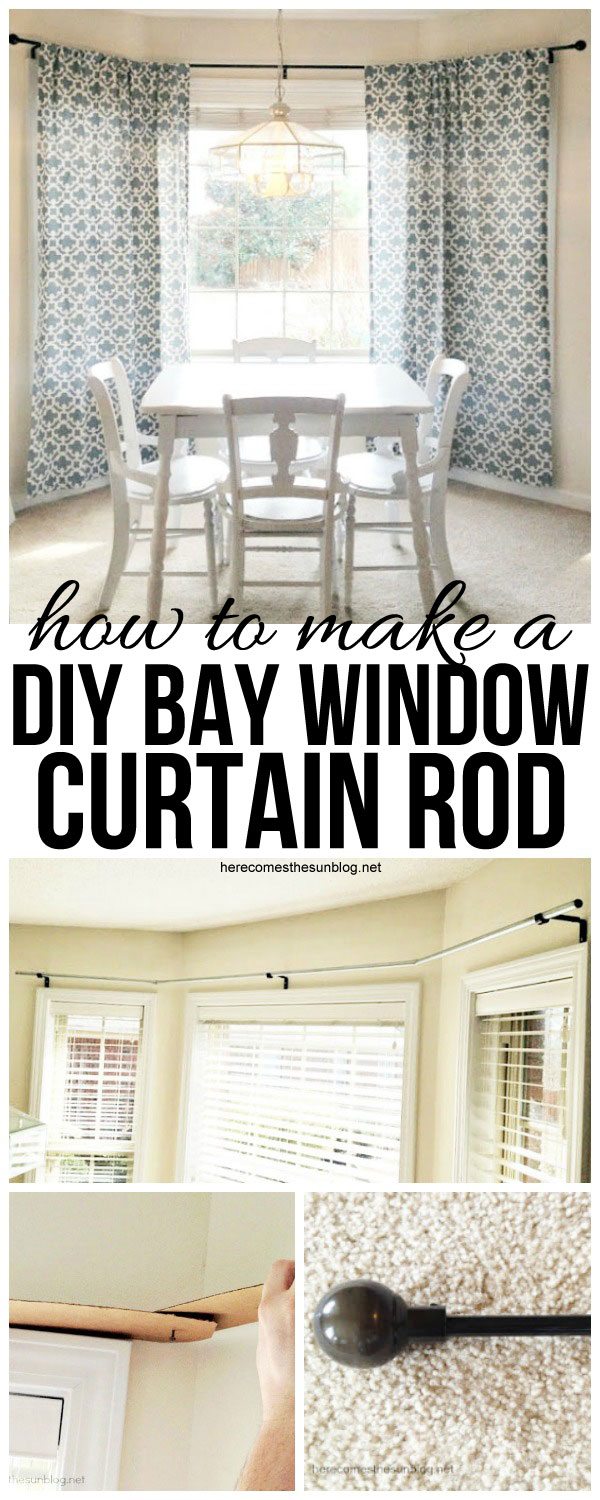
DIY Bay Window Curtain Rod
This post may contain links to affiliate websites, such as Amazon and we receive an affiliate commission for any purchases made by you using these links.
We have a bay window in our dining area. And if any of you have priced a bay window curtain rod, you know that you pretty much have to take out a second mortgage on your house in order to afford one. But what if you could MAKE a DIY Bay Window Curtain Rod for about $10? WHAT? Yes, you can! and I’m going to show you how easy it is.
^^^PIN THIS SO YOU REMEMBER TO MAKE IT ^^^
It all started with these amazing curtains. I wanted them in aqua. So I went on the hunt. I found out that they were sold at Target so I ran over there one day thinking I would pick some up. SOLD OUT. I called other Targets in nearby towns. SOLD OUT. I thought surely I could order them online. NOPE. Aqua was… SOLD OUT. I called my mom who lives 12 hours away to help. She was able to get a hold of one panel. After months and months of waiting and stalking Target every day that a new shipment came in, I FINALLY got a hold of another panel. I bought two just in case. So now my curtains needed a way to hang in my window. Here’s how you can make your own.
DIY BAY WINDOW CURTAIN ROD
- Measure the distance along the wall from the outside of one window casing to the outside of the other casing. Allow for any overhang that you want.
- Purchase this length of metal conduit at your local home improvement store.
- Measure from the outside of the casing to the first bend in the wall. Measure this distance from the end of the conduit and place a mark using a Sharpie. Do this for the other end of the conduit also. This is where you will bend your rod.
- Make a template out of cardboard, a nail and a clip like in the picture below. Use this template to measure the exact angle of the bend. Adjust it to the correct angle and secure with the clip.


Now to bend the conduit: you will need help with this. Have one person hold one end of the conduit on the floor and the other person bend the other end. Use your foot for leverage when you bend it. Bend it until it matches the angle of your cardboard template.


Everyone needs a little helper 🙂

After you bend your conduit, hang it up to make sure that you have it exactly the way you want it. You may have to do some more bending to adjust it a bit.

After you have your conduit exactly the way you want it, spray paint it to match the other rods in your house, if needed. I spray painted my conduit with Rustoleum Metallic (affiliate link) in Oil Rubbed Bronze to match the curtain rods in my living room. I LOVE this spray paint! It really covers well, doesn’t chip or flake and the metal conduit looks so much like the other “real” curtain rods in my house that you can’t even tell the difference.

The hardest part was finding finials to fit the ends of the conduit. The finials that we had on hand were too small to fit over the conduit but the rod that they were attached to was just the right size to slip INTO the end of the conduit. We simply cut the rod and slid it into the end of the conduit. Sometimes you just have to think outside the box! We did not use anything to permanently secure the finials on because we wanted a way to take the curtains off for washing.

Here is my window before:

And here is my window after:

I think the window looks better all dressed up, don’t you? The cost of this DIY bay window curtain rod was less than $10! A couple bucks for the conduit and about 7 bucks for the spray paint. We had everything else on hand. But even if you don’t have everything else on hand, it is definitely cheaper than purchasing a custom bay window curtain rod. Now I just have to figure out how to revamp that ugly light fixture!
IF YOU LIKED THIS POST, PLEASE CONSIDER SHARING IT ON SOCIAL MEDIA WITH THE BUTTONS AT THE TOP OR BOTTOM OF THE POST.
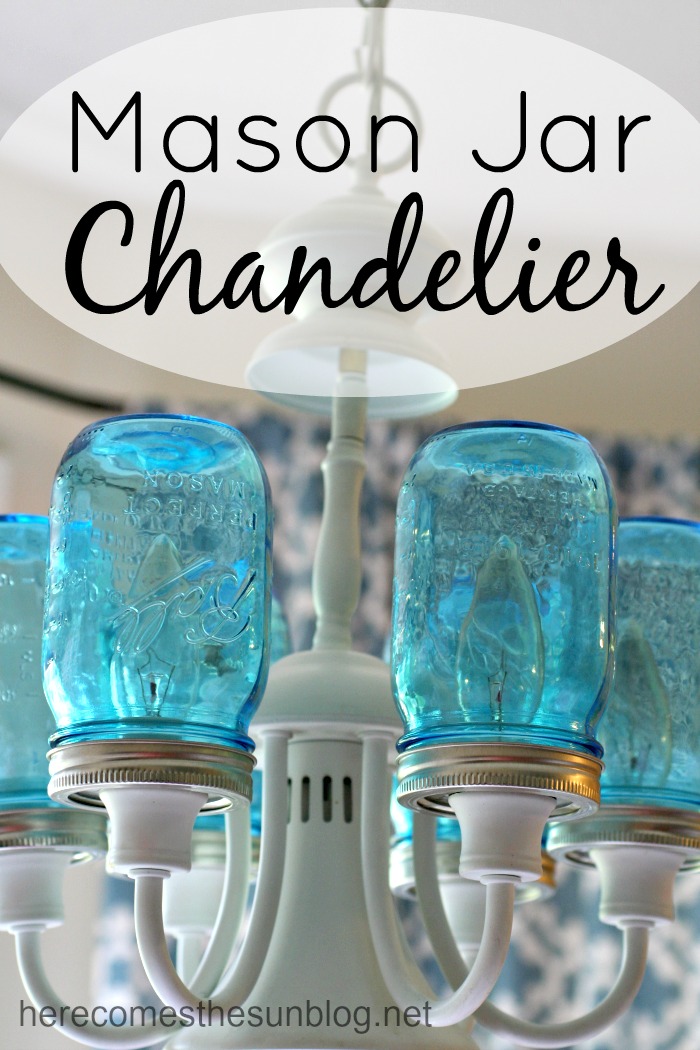
*UPDATE: You can see how I revamped my ugly light fixture here.
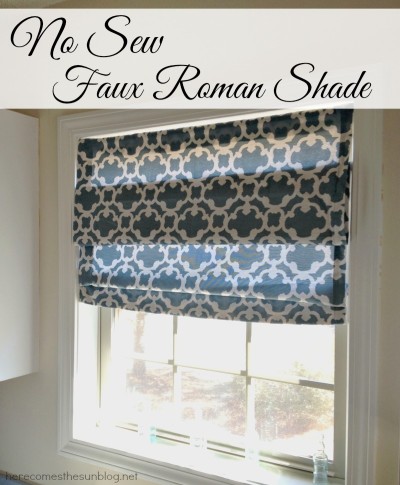
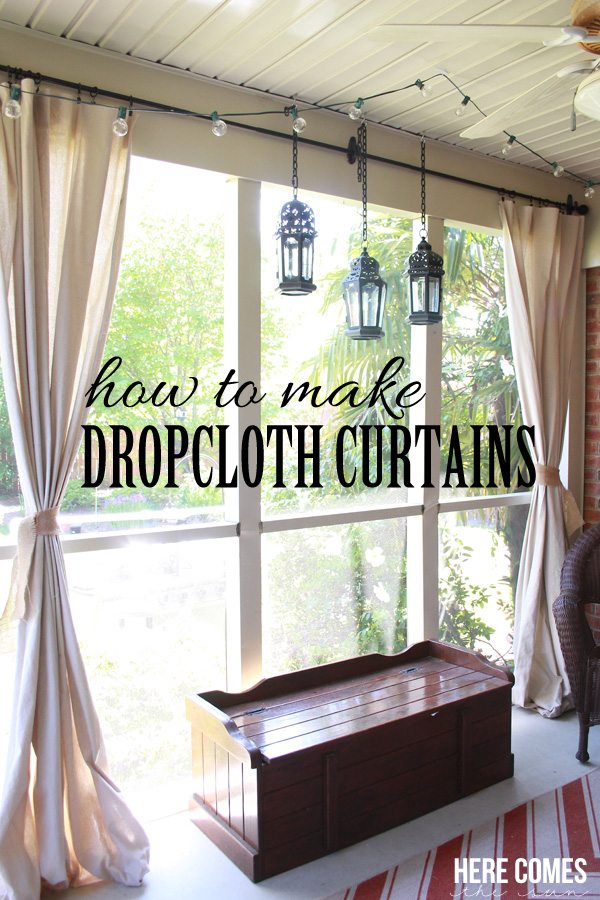
WANT MORE CURTAIN PROJECTS?
This is pretty darn awesome! I don’t have a bay window in my house, but I have always wanted one and this is pretty ingenious! Love those curtains too!
I love those curtains! I could definitely see why you went to so much trouble to get them. That cardboard idea is genius! If I ever get a bay window I will have to remember this!
Love, love, love this! I have a bay window in my kitchen and haven’t wanted to cough up for the rod extenders. This is a brilliant idea!
This is amazing!!!! I have had the exact same problem! I do NOT want to pay for a bay window rod and I have a window in my bedroom that is driving me bonkers!!!! Thanks for sharing!
Genius! I am so doing this for my master bedroom.
What a brilliant idea – and tutorial – and your window looks amazing!
Your newest follower – come by and visit when you have the time!
Hugs,
Suzan
I really needed to see this post! I so need to do this! I am featuring you tomorrow! Thanks so much for linking up with me last week!
Kim
Hey Kelly!
Did you just put your foot near where the marking was to get it to bend there? I got the supplies and want to make it but I don’t want to bend it wrong.
Thanks so much,
Mallory @ Classy Clutter
Hello!
Show and Tell Saturday at Sassy Little Lady is LIVE! I’d love to have you share your post!
http://www.sassylittlelady.com/blog/show-and-tell-saturday/show-and-tell-saturday-2
Kathie
I can’t tell you how excited I am about this idea! I have a large bay window/French door combination. This will be the perfect solution to the expensive custom rods I was looking at. Bless you for sharing!
Linda
Oh my goodness…..I’m in LOVE with your window, room, curtains… I’d love for you to come link this up at my Tuesday Time Out!
Melanie Reasons To Skip The Housework
I read your post and immediately went out to Lowes. The metal conduit is $1.57 per ten feet!! It’s so easy to bend. I look forward to spray painting tomorrow and hanging my shower curtain-turned-curtain! Thanks for the post!
So glad you liked this post! Enjoy your new bay window curtain!
What about using wine bottle stoppers in the end of the conduit?????
So clever! I’ve never had a bay window, but have always wondered about that!
OH…MY….GOSH… this is amazing! Seriously, I wish I could just hug you right now!!!! I have a bay window in my breakfast nook and I HATE how … NAKED and empty the space looks (we have really tall ceilings)… I had JC Penney’s come out and price out a nice window feature… to the tune of about TWO GRAND!!!!
GASP! Yeah, NO!
My only question is … how do you make sure you’re bending the bar in the same spot? Meaning… that one side doesn’t go facing north and the other facing south? Is that hard? Does this make sense? OMG I so want to do this THIS WEEK!!!!
You use the cardboard template to make sure your angle is correct and then use your foot as leverage to help bend the conduit. Have someone else hold the other end while you do it. You may have to do a bit of adjusting once it is up.
I have read your solution but I cannot figure as to how you could get rid of the kink in the conduit after bending, it does not look good at all I have tryied filling the conduit with sand and bending it but to no avail there is still a bad kink
The curtain covers the kink on the rod.
I did something similar with a long curtain rod. I just bent the angle on my concrete step after marking where the band went with a piece of masking tape. worked out great!
Holy S!! Are you kidding me? I was about to spend like $300 bucks for curtain rods and connectors, but realized my 24” windows installed in 1926 are no longer “standard” ha. THANK YOU SO MUCH for this tutorial. Awesome!
Holy S! I was just about to spend $300 for curtain rods and connectors until I realized my 1926 24” windows are no longer “standard” ha! Thank you so much for this tutorial!! Awesome.
So glad I could help, Cassie!
Great idea! Where did you get the brackets for holding the conduit up on the wall? I assume you had these on hand in your house, but do you have some tips on where I can go to find brackets like these? They look so nice and simple. Also it looks like one can easily lift the whole assembly off, like if you wanted to take the curtains down for cleaning or whatever. Love it.
You can find the brackets in the curtain section of Target/Walmart etc. I’m not sure if they are sold separately or not. Mine were left over from an old curtain rod I had. Yes, it is very easy to remove the rod for cleaning.
A suggestion for the chandelier thing. The glass piece that hangs over the lights looks particularly dated, so I would look into removing that, and perhaps painting the rest of the piece. It might not look great, but I think it would look better than it is now. I think that weird glass piece is mostly what’s making it look so dated. I also googled “self made chandelier” and came up with http://www.decoist.com/2012-04-05/diy-paper-orb-chandelier-made-of-cupcakes/ which looked pretty nifty!
Great idea for curtain rods. The paint you used has a warning to not use it on galvanized surfaces. I googled and it seems that most spray paints are not supposed to stick on the galvanized metal. How is your paint holding up? Thanks.
The paint that I used was made specifically for any surface. It is holding up well.
Thanks for this great tutorial! Very timely for me! I was just considering just how to “dress” that bay window in the dining area! Can’t wait to get out to the local home improvement store to get some conduit! (They have the hanging brackets, too). How about using cabinet knobs for smallish finials? You could just use a good adhesive and glue them on. My curtains are definitely NOT coming down for washing often! Once up, that’s where they’ll stay!
I just made one of these for my bay window. It took longer to get someone from Home Depot to actually cut the conduit metal than it did to complete the entire project!!! Just followed your instructions and my windows look great now.
I’m so glad you found my tutorial useful, Tori! Thanks so much.
Thank you so much, you are a genius! I have a unique problem, I want to hang curtains on the ‘outside’ of the bay, and couldn’t figure out how to do it so that it looked good and this is the perfect solution.
My bay window sticks into my bedroom, and I want the curtains on my side of the window.
I’m glad my tutorial helped. Thanks!
Did u use 1/2 inch or 3/4? Thanks
I’m assuming you are referring to the conduit size. Either size will work.
This was my same question. I bought 1/2 in and I’m having a heck of a time bending it!!
Nice draperies, but a little short for my taste. We bent regular rods as someone posted, worked just fine.
THANKS KELLY FOR A GREAT TUTORIAL. I HAVE A SQUARE BAY WINDOW AND YOUR TUTORIAL CAME JUST IN TIME. BY BAY WINDOW WILL BE ALL DRESSED UP AND READY BY CHRISTMAS TIME.
THANK YOU
I’m so glad you found this tutorial useful! Thanks for stopping by!
This is the exact solution I need! Thanks for sharing.
I’m glad it helped you!
Kelly your Awesome! Can’t thank you enough for this solution to such an otherwise ridiculous costing hardware that I have refused to get for years because I knew there had to be a better diy way. Very excited to get to both the bays now:)
Thank you, April! I’m so glad you’ve found my tutorial helpful. So much cheaper than paying for custom hardware!
Thank you so much for this post, it was a God send! It worked perfectly and I couldn’t be any happier with the final results. Thank you, thank you, thank you!!!
Thanks so much, Kristina! I’m so glad that my tutorial helped you.
Kelly, First and foremost I want to say thanks! Quickly, we bought an older home and room by room we’ve been working “at” it! Lol Our dining room has an oval (concave) shape that spreads across the width of the room. Finding a rod would have to be special made and no telling the cost! We took your idea and ran with it literally to Home Depot! Lol we bought both the metal and plastic conduit. We didn’t know if we could bend the metal in the shape we needed. That’s where the plastic came into play. We used 5 brackets to hold it into place and it wrapped perfect around that window. Oh we had to use part of a second (about 3 ft) that’s held by a connector. I used finials I already had so total cost maybe 15.00. Thanks again!
Hi Sharri! Thanks for stopping by. I definitely know what it is like to have an old house and have nothing in it be “standard”. Our previous home was built in 1928 and I felt like we worked on it every weekend. I’m glad you found my tutorial useful and that it helped save you some money!
Hello Kelly
After much googling and phoning local stores that should stock ‘Bay window rods’ I came to the conclusion that I would have to make these myself via your brilliant instructions…my question to you is, after visiting a local hardware store they didn’t have ‘metal conduit’ but did have ‘chrome rods (conduit?) now I am concerned as to, will these bend like the metal conduit you use ??? I am readu to cut it to the desired length but am now concerned re the bending possibility.
Many thanks, Kay
Hi Kay! I’ve never used the product that you are using so I can’t tell you for sure. Stores such as Lowe’s or Home Depot carry metal conduit.
Hi Kelly, Many thanks for your reply, the product I asked about definately won’t work but I now have what I believe to be the product you refer to, as there are quite a few ‘metals’ that can be incorrectly purchased I believe what you refer to when you say ‘metal’ conduit is ‘aluminium’ conduit as this is the bendable one. YAY now I can get cracking, I will let you know when I eventually get them completed, cheers Kay
Hi,
Thanks for the post. We followed everything you said and made it. This is our first DIY project ever since we owned our first home. Thanks.
Hi Kelly
You inspired me to try this and even though I couldn’t get the pole, I Improvised with poles from Ikea. They did the job but I need to get the right pole now to do a double bay window rod!
I’m always trying to think outside the box, not having much money forces you to be creative and therefore you get more pleasure out of your projects…think of the money you are saving us guys! Many thanks, hugs from Cardiff, Wales, u.k xx
Hi there. I love this idea for a bay window, but mine is longer than 10 feet. Does anyone have an idea for how that might work/be addressed or is a no go for me. I was wondering if there might be some kind of discreet ‘joiner. and use half of two electrical conduits joined together in the middle. A
Hi Cathy! I would see if your home improvement store has the length of conduit that you need. If not, then purchase two and a coupling to join them together.
I know I am YEARS late to this post, but I used your tutorial a few years back to do all of the windows in my house (no bay windows) and they came out fabulously. I just cut the conduit down with a hacksaw and hot-glued finials to the interior of the rods. In fact, the reason I am back – I’m in a brand new house and it’s time for window coverings again, so here I am. Thank you so much for posting this. You saved me an absolute fortune!
I looked for a way to post a picture of my “curtain rods,” but couldn’t figure it out. I guess you’ll just have to trust me. 🙂
Thanks again!
Hi Laura! Thank you for being such a loyal reader and coming back year after year. I really appreciate it. I’m so glad that my tutorial has helped you save money while decorating your home!
Hello!!!
First of all thank you for your post, we just moved to a new house that has a bay window an this is a great tutorial for saving some money $$!!
I know this is an old post but hopefully I can still get an answer.
Yesterday I bought everything to get this project started but now I have a couple of questions regarding the paint. I’m using curtains that have metal grommets so I’m a bit worried about the psi t since there will be constant sliding of the metal on metal. Do you think that the paint alone can stand the sliding grommets?? Or should I finish with a clear top coat to protect it? Did you use prime on your conduit before painting?
Thank you in advance!!
I did not prime mine. If you are concerned about the metal grommets scraping up the paint, I would use a clear top coat.
What do the rods look like after a few years of use? Does the paint peel off? On the can of Rust-Oleum paint it says not to use on galvanized metal. I don’t mind a few scratches but I don’t want paint peeling off.
Hi Wendy! The paint on my rods did not peel off. I didn’t use curtain rings though. My curtains were tab top so I just threaded the rod through the pocket and hung it up. There was nothing to scratch the rod. Hope this helps.
Helpful tutorial!
This may be a stupid question but, do the corners not droop? I have drop cloth curtains so I am afraid they would not hold in the corners where there is no bracket/support?
Hi Katie! I didn’t have a problem with my curtains drooping. You can always add more curtain rod holders for support.
Our newly bent and painted conduit is drying in the garage! Tomorrow I’ll hang it up. Thank you.