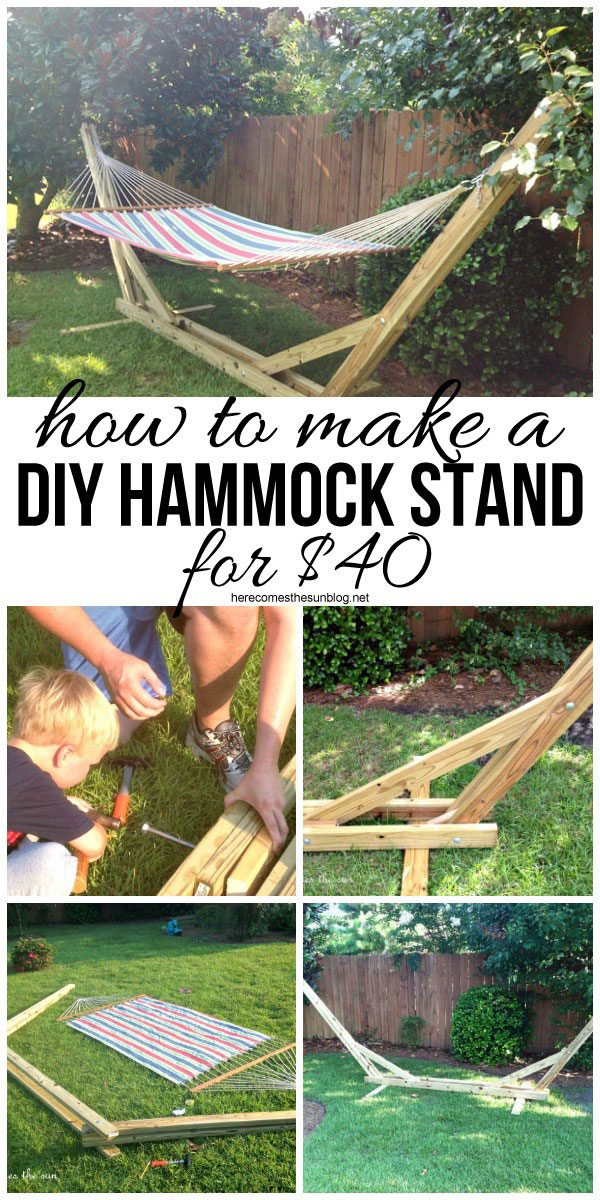
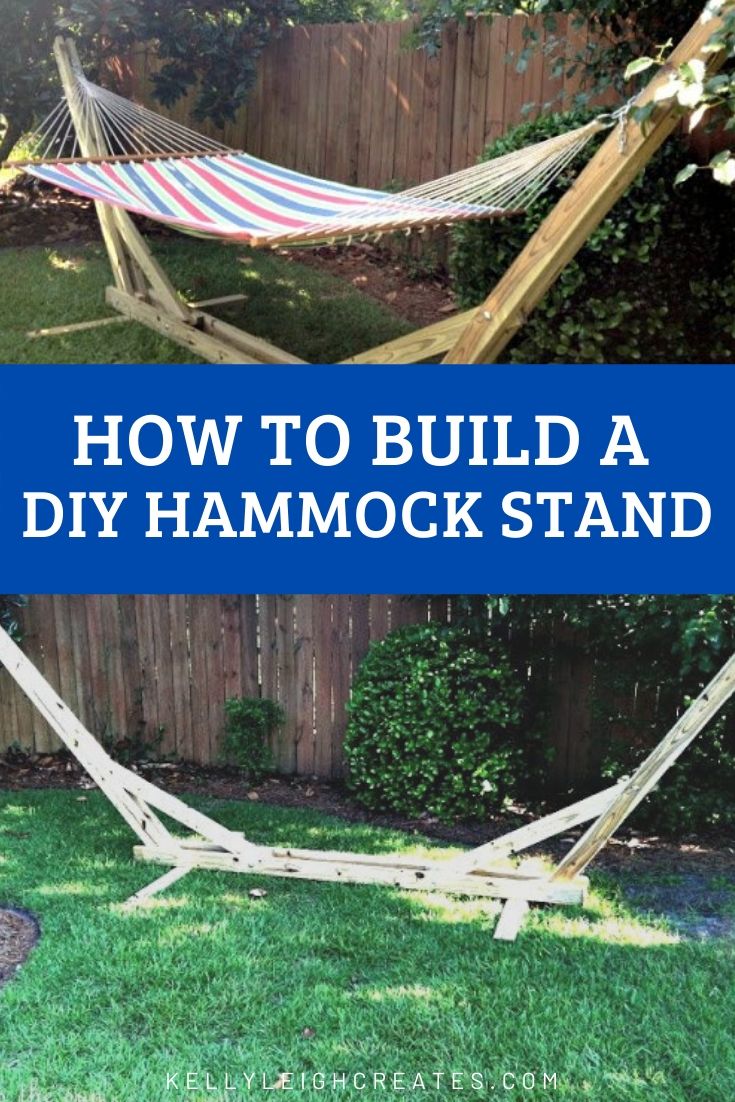
Learn to build a DIY hammock stand with this easy tutorial.
A hammock is the perfect outdoor relaxation spot. It calls to you to come lay down and read a book, take snooze or enjoy the clouds floating by. Everyone could use more relaxation in their lives. But what do you do if you have no trees in your yard to hang a hammock? That’s our problem but that didn’t deter us from buying a hammock. No trees close enough together to hang a hammock? No problem. We figured we’d just buy a hammock stand too.
Have you checked out the prices of hammock stands? We were in shock. Sometimes the stands cost more than the hammock.
This is not a relaxing feeling for me. UGH.
So we built our own hammock stand for about 40 bucks.
DIY HAMMOCK STAND SUPPLIES
Supplies:
Eight 8′ 2×4 boards
Four 1/2″ diameter, 12″ long bolts
Six 1/2″ diameter, 8″ long bolts
***I have had several people comment that 12″ and 8″ bolts are too long. They do stick out a bit so you may want to take a look at the photo that shows how to hang the hammock for an up close view of the bolts. Then determine if you want to use shorter bolts.***
Ten 1/2″ nuts
Ten 1/2″ washers
Measuring tape
Circular saw or chop saw
Drill and 1/2″ paddle bit
Deck screws
If you are searching for THE perfect hammock, you can find lots of different options here.
HOW TO BUILD A DIY HAMMOCK STAND
Instructions:
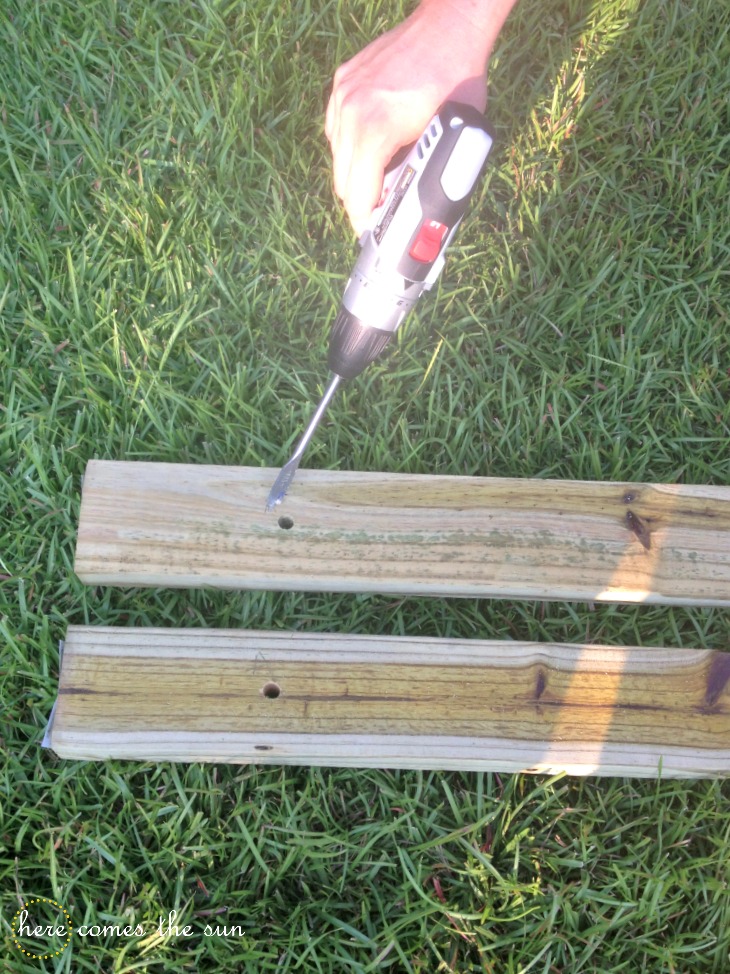
Lay two 8′ boards parallel to each other. With your paddle bit, drill a hole 6″ inches from each end.
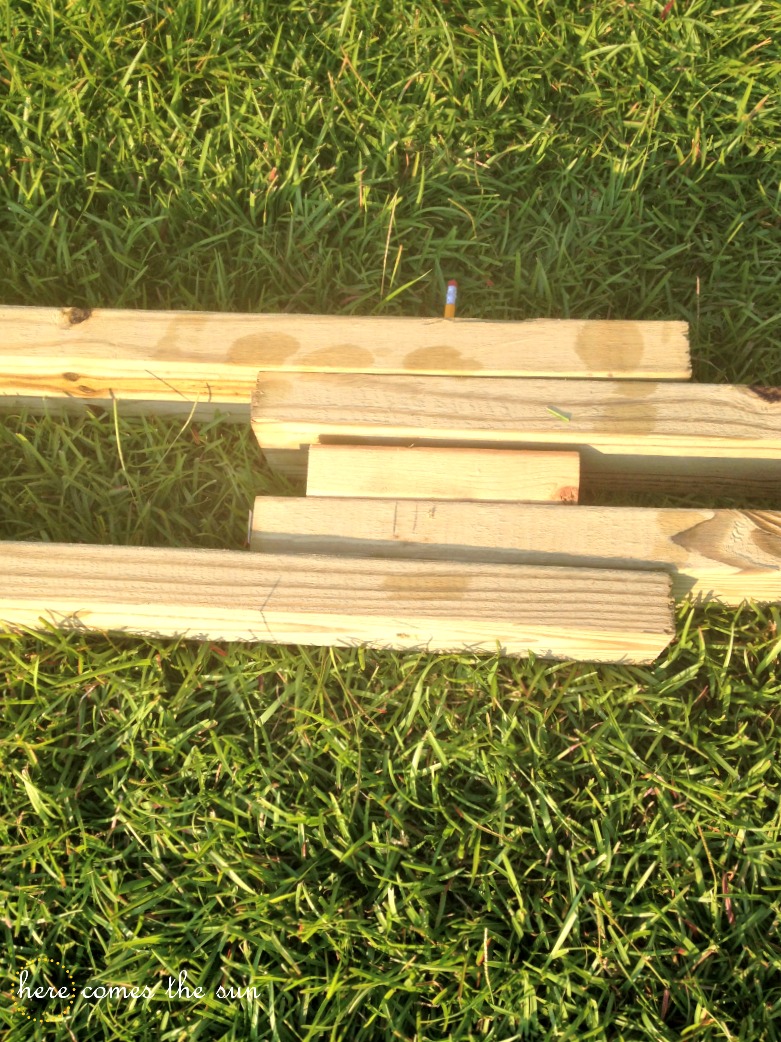
On two other 8′ boards, drill holes 4″ from one end and line them up like the picture, below. Use a small scrap piece of wood for a spacer (drill hole through it). Bolt through all 5 pieces of wood with a 12″ bolt and secure with a nut and washer. Don’t overtighten the bolts at this point because you need to be able to swivel the boards.
When possible, get little helpers. Little boys are eager to help. My girl, however, was more interested in the latest app on the phone. Here is little man helping pound the bolt through.
This is how it should look after both sides are done. Lay out your hammock to determine what the angle of the boards need to be to fit your hammock.
You want the hammock to attach approximately 4′-5′ from the ground.
Use a template to get the same angle on each end. You can print out a protractor online. Our angle was 120.
Once you get the angle you need, cut another 8′ board in half to make a brace for each end. Use 2 spacers for each brace and secure with 12″ bolts through the spacer and an 8″ bolt on the “arm”. The picture below also shows the “feet” attached as well which is detailed in the next step.
Cut an 8′ board in half for the “feet”. Tip the hammock stand up and screw “feet” in with deck screws.
Put an 8″ bolt through both of the “arms” for hangers. The placement will depend on the size of your hammock. You want the hammock to be about 4′ off the ground. Be sure to leave room for sag. Also, install a spacer right below the hanger. Use deck screws to attach spacer. If your hammock doesn’t come with a hanging kit, you can purchase some large “S” hooks.
Here is the finished product.
Tighten up all your bolts and hang your hammock. Move hammock to a shady area in the yard, pour yourself a beverage of your choice and relax. Our hammock usually gets hijacked by the kids. But I am going to take a nice long nap in it in a couple weeks when they are both back in school!


Your step by step information to create a hammock stand is really informative and simple to follow. It is a great option for anyone who has no option to hang a hammock in his house or lawn or in his garden. By the way thanks a lot for such a nice and informative information. I am waiting for more updates in your next post.
hammock frames
I like your step by step. I think I can follow it. We will see. However 2 years after you made yours I spent 76 dollars on my materials. Ugh… But still 100 or more dollars I would spend buying one. Thanks Mike
Just finished this build.
It was a bit more guessing than I originally thought it was going to be.
The 12in and 8in bolts were WAY too big (ended up having to saw off about 3 inches on the 8’s and even more on the 12’s).
Went ahead and used 120^ for the angle of the arms since I don’t have the permanent hammock (using my backpacking one right now).
When trying to drill through five 2-4’s at the same time things get a bit weird.
You need a pretty long bit or you will have to figure out a way to drill them all separately.
It would have been great to get a more precise cut list, but seeing as you are supposed to determine your angle and height to match your hammock, its not really possible.
When all was said and done, the stand felt pretty darn solid.
I was initially worried about the swinging forces on those legs, but it doesn’t seem to matter.
Thank you very much for the plans, the stand looks great, can’t wait to get a fresh coat of paint on it and a new hammock.
You drill through the 2×4’s separately. Not all together.
Hey i love this but were did you manage to get the wood so cheaply
We bought the wood from our local Lowe’s.
Just finished building this…thanks for making it so easy!
You’re welcome, Greg! I hope you enjoy your new hammock stand.
The directions were great! Bolts were definitely way too long! I have a two yr old so I had to change them out so she wouldn’t fall on them. The list needs to show an extra 2×4 for spacers. I had to go back to the local hardware store for an extra. I added two extra bolts and added hanging pots on eachend for color. Also added a handle on one end and large wheels on the other for easy movement when mowing the lawn.
Windy, I like the idea of wheels and a handle for mobility. How did you do it and what did you use
I dont know if you can pod a picture but that would be great. Thanks
Hi Kevin
Can you share how you attached the wheels, and wheel specifications?
Thank you
A dremel/grinder would fix the bolt problem for anyone still wondering (if you don’t have either almost any hand saw will do the trick). It’ll save you some time on measuring. On top of that you’ll probably spend more money on gas than you would just buying smaller bolts. It is a budget build and all.
Please share photo of wheels and handle idea
Thanks.
So I did this today.
I would suggest an extra 2×4 for the scrap pieces.
Also I would suggest using 6″ bolts in place of the 8 inchers and 10 in place of the 12 inchers. This would would allow you to use a 3/8 set up and savea little cash.
So you only need 4 of each size bolt though as long as you are using deck screws for your spacers just below the bolts that hold up your hammock.
For those of us that dont like to measure angles just measure the points you put the bolts for the brace.
For instance I did 24 inches in on the bottom and 26 inched up the mounting 2x4s. It placed the hammock height at around 4.5ish feet which is perfect.
Mahalo!
Amen!
For those who have built this, what would you say the weight limit is? I weigh 220, so I’m curious how much sag there would be. Can this setup comfortably hold 2 adults?
Yes, the stand can hold 2 adults. My entire family has been on the hammock at the same time (2 adults and 2 small kids) and we had no problems.
Awesome! Pinning this for summer 🙂
Love this!!! Great job!
Approximately how much will this cost to make?
Disregard my previous comment, I see it says 40 bucks. Beats the 200 I was planning to spend. Thanks so much, can’t wait to give this a try.
You’re welcome, Devin! I hope you have many relaxing days in your hammock this year!
Searched a lot and have decided to go with the design. One question, when you laid the hammock out flat on the floor, what was the length from ring to ring. I’m guess my hammock is smaller than yours, and I’m trying to determine of I can make adjustment to make the frame smaller. Thanks.
Hi Chad. The length of our hammock from ring to ring is 13 feet.
Hi Chad
You would lay it out to adjust the angle. If needed to make shorter, cut the bottom 2 boards to 7 feet or 6 feet then follow the instructions.
Great set of plans, great photos too! well documented
Cheers
If your hammock is smaller, use chains at each end for hanging
What size hammock did you get? Do you have a link you could provide? I am dying to do this.
Thank you.
The fabric portion is 7 feet long. The whole thing (tip to tip) is 13 feet long. Then we added a few links of chain.
We just built this and it’s monstrous! Definitely only need 4 of each 6″ and 10″ bolts. If you measure things before you start, you can probably get away with 6′ uprights. (Our hammock is a little shorter) The extra 2′ cut off each upright will give you the extra pieces needed as spacers.
I’m glad that you were able to modify the stand to fit your hammock. I hope you have many relaxing hours now that you have a place to hang your hammock.
Searched the internet for a DIY Hammock Stand and stumbled upon your design and site. First, I’d like to thank you for providing this site. Secondly, your design was well thought out and well presented with comment and photos. I will be making this stand this weekend. Apparently we have similar hammocks as far as size and weight capacities. Thanks again!
Your step by step guide to help me create a hammock stand is easy
finished my stand last week:
https://scontent-ams3-1.xx.fbcdn.net/hphotos-xpt1/v/t1.0-9/11873670_10206940797589122_3575917029746132194_n.jpg?oh=0faf1f18c86933c29c5905a7313ab8b7&oe=567EABD2
It looks great, Michiel!
We made one. Thanks for the plans!
You’re welcome, Dan!
Any way for us to post pictures?
Dan,
You can upload your photo to a sharing site and then post the link here. Or you can send the photo to me at [email protected] and I can put it in a gallery at the bottom of my post.
Nice, thanks for sharing. Just what I was looking for.
Is this meant to be taken down/ does it break down for easy storage?
Hi Christina! Good question. The hammock stand is not meant to be taken down. If you want/need to store it, you would have to take it completely apart.
Just built this last night with my roommate over the course of 5 hours (we had a terrible power drill that would not hold its charge–it could have easily been finished in less than 3 hours). As a college student, this project was well within our budget (despite us spending $58 rather than $40 on material). The instructions were very easy to follow and ultimately I am very pleased with the final product! I know the instructions recommend using 12″ long bolts as well as 8″ long bolts. We used 10″ long bolts instead of the 12″ long bolts and that was still more than long enough. You could go with 6″ long bolts instead of the 8″ long bolts. Additionally, the instructions leave out the wood needed to build wood spacers. We used eight 4″ long spacers essentially shaving off 4″ from each 2×4. It’s also important to note that this hammock stand is really long! I have a 8.5 ft long High Hopes hammock used for camping that doesn’t fit in the stand without the use of extra straps. Lastly, I’m a current civil engineering student and I calculated the hammock stand to carry a max load of 481 pounds. I used basic mechanics of materials, the bending strength for douglas fir, and assumed a factor of safety of 1.3. If you are on a budget and have access to tools, I definitely recommend building this hammock stand!
I’m so glad that these plans worked for you! I know that the bolts that we used were longer than actually needed so thank you for letting everyone know the size that worked for you. We also assume that people have scrap wood laying around for the wood spacers, which is not always the case. This is why we didn’t include the wood needed for the spacers in the plans. Enjoy your new hammock stand!
My theory is go bid or go home. So I used your plan with 2x6x8 boards. Followed your directions to a tee otherwise. This thing is a monster but looks awesome. Thanks for your design it was a breeze.
Excellent Hammock stand and fairly easy to make. I made it towards the end of last summer and it wintered well. My hammock is rated for 450 lbs, two full size adults and is 13 feet long. It easily supports us both. Thank you!
Thank you get much for sharing your hammock design.I just completed it, and I Love it! I definitely want to add wheels to it, to make it easier to move around the yard to mow, etc. If anyone has specifics on how to do that, and is willing to share, I would greatly appreciate it.
Thank you again
Great instructions. I built one for my dad for fathers’ day and he loves it.
I had difficulty aligning the holes on the “arm” where the hammock hangs from. I measured it twice from the ends of the “arms” and it was about 1/8″ misaligned. It was enough to prevent the bolt from coming through
I don’t know why everyone comes up short on wood for spacers. I wound up cutting 30″ from each “arm” (which wound up being 5′ from the ground) which is plenty of lumber for spacers. It does take some foresight because spacers are required before securing the arms.
A couple suggestions:
forgo one of the 8′ 2×4’s for a 8′ 2×6 or larger for the “feet”. It’s only a little extra, but the improved “feet” support is noticeable. if you plan on putting it in the lawn, consider sticking with the 2×4 for grass health.
Deck stain. with 1/2″ bolts and solid lumber, this thing is built to last. deck stain+paint brush is around $10, and it adds life and looks to this stand.
Finally, if you have metal working expertise, tools, comfort, etc. you can save a few dollars by replacing the bolts with cut all-thread. I used 72″ all thread and was able to cut 6 6″ instead of 8″ bolts and 4 10″ instead of 12″ bolts. you can do this with a table saw or a hack saw, and polish the ends with a file or power sander. You have to double up on washers and nuts, but in the end you save a lot of money. I’m not sure how much money could be saved exactly, but 10′ of all-thread is about $12, which is the equivalent of 2 or 3 12″ bolts.
Great instructions and fantastic DIY project
Good product with reasonable cost
This is a very great idea! Thank you for putting up the plans and for the helpful tips. Further in my build, I unfortunately noticed something wasn’t right. I then noticed the second picture on the plans, that shows the boards coming together with the spacer, does not seem correct. From the picture it looks as if the 6 in hole drilled boards are on the outside and the 4 in. are on the inside with the spacer. This threw me off when I came to put the leg attachments on and the spacing was all off. Nonetheless, I realigned a few things and it was still done in a very short amount of time. If I had just looked ahead at the rest of the other photos to see the finished product I would have fixed it earlier. Regardless of my mishaps, I still applaud this great idea and welcome this perfect fit for my backyard.
Thank you for the information
Just finished building this with and for my daughter and it made for great bonding time! Comments about bolt lengths are spot on, but if I’d thought about it, I would have realized in advance that the lengths were a bit excessive. Be careful using threaded rod – if you don’t keep the ends of the thread pristine, you won’t be able to get the nuts on. Better to spend the extra change on bolts! I’m impressed by the guy who did the “strength of materials” analysis to determine the weight capacity. I have two engineering degrees and probably could have done that once upon a time. At 61, I’m now a trigonometry teacher so I calculated all my angles and bolt/spacer locations that way and plan to use it as an extra credit problem for my kids this semester! My daughter and her golden retriever love it – thanks for a great set of plans!!
A tip regarding cutting threaded rod: before you start cutting thread on 2 or 3 nuts. Make the cut then remove the nuts. As they come off they will tidy the thread.
My daughter found your blog and we thought a DIY hammock would be a great birthday surprise for my wife. Not only did my wife love it, it was great to spend some quality time with my daughter – she got such a great sense of achievement from making this. Thanks!
Thanks so much, Chris! I hope your wife is enjoying her hammock!
I just built this, these instructions were very useful and the project was much easier than I expected. 2 adjustments I would recommend. Use a larger paddle-bit than the bolt you are using, I used a 5/8″ this makes the holes bigger and literally gives you some wiggle room if your holes don’t exactly line up. I also would use a thinner bolt to hang the hammock o,. carabiner clips I have don’t fit on the half inch bolt, but this will depend on the situation. Really cool project, thanks for posting.
Pretty much have the hammock up and running. Bolt size is a lot too much but oh well.Some said to go to 6 and 10 inch. That’s a bit much too but with a bit of tweaking this is a great project and kudo’s to you strong and cheap design. I had the 2×4’s so this cost me about 30 bucks. I saved around a 100 for a boughten.
Made this today. Great instructions and really happy with the result. Just got to stain it up now and then relax.
So, I just finished this yesterday. It took about 5 hours and it looks and works great. It’s going to look even better after I stain it! All the materials ran me about $80 at Lowes…so not quite $40, but we live in an expensive area so I’ll chock it up to that. I used 4″ blocks cut off the cross beams underneath and also off the two diagonal beams going up. I just used a 120 degree angle and called it good. Getting the holes lined up, trimming up the corners of wood sticking out were a bit tricky though a little bit of math and measuring twice made things a little easier. I used 10″ and 6″ bolts and still feel like they stick out a bit so I may eventually hack them off. I also just used some deck screws on the spacer on the diagonal beams going up, rather than a bolt, so I only ended up using 4 bolts of each length. On the feet, I cut notches so the bottom of the cross beams is level with the main beam across the bottom. Overall a fun project that helped my Webelo I Cubscout check a box for his Fix-It requirement. Thank you for the post and instructions!!
Thanks so much for these instructions! I just finished building this and it turned out really well. Here in Atlanta, the lumber and bolts (I went with 10″ and 6″ as others had suggested) were about $60. I used a 5/8″ paddle bit for drilling the holes. It took an afternoon and I’m really pleased with it. I used the 120 angle measurement and that works fine with my Eno hammock with Atlas suspension straps. If using the Atlas straps, just wind them around the top of the arms a few times to take up some of the slack. Here are some photos: https://goo.gl/photos/XFss3XgJcjufSrXP6
Hi Ben! Your hammock stand looks great! Thanks for using my tutorial.
Wow, great guide! Had to change the units to metric and made some things my own way but this was very helpful. Thank you very much, and cheers from Finland!
This is great!
I have yet to make my own hammock but I’ve added this to my Evernote for when it do make one.
Hopefully it’ll be this summer
Thanks for the step by step! Successfully made one with modifications after reading through all the comments. I used the shorter bolts (6″ and 10″), and only needed 4 of each. I also cut down the two “arms” to 54 inches since I’m using an Eno backpacking hammock and those extra pieces worked well for cutting up into spacers. Now we just have to sand and stain so it can sit outside year round!
Thanks again for sharing!
Was wondering if I could get a printable plan for this project. was wanting my father in-law to make it for my husband.
Hi Karen. I don’t have a printable plan for this project. The photos in the post lay it out well. You may want to read through some of the comments to see the helpful suggestions from others.
I added a 8″x2″ wheel with a 1/2″ bore on the front of mine. I got the wheel at Prince Auto which is like Habour Freight. To add it, I left the two bottom piece of the frame longer then needed. I added two 1″ spacers for extra strength. This left 2.5″ of space for the wheel. I used an 8″ long 1/2″ carriage bolt as the axel. I used 1/2″ bolts and washers to center the wheel. I have included pictures.
Thanks for the great plans.
Jason
Just finished this build! It was cheap and only took about 2 hours of total work! So excited to use my hammock in places where the trees aren’t cooperative haha. Thanks for this!
Works great!!
Anyone have any ideas on installing an awning/sun shade of some sort over this hammock stand?
Many thanks in advance for any helpful tips.
Anyone have any ideas on an awning/sunshade of some sort to cover this in areas without trees or any kind of shade?
Maybe a big umbrella – like for a picnic table?
I might do a shade sail. I have several and they are cheap.
I didn’t want to permanently mount them, so I just have pieces of wood anchored in 5 gallon buckets I filled with cement. Then hooks on the top that I attach the shade sail strings to.
They aren’t beautiful (although I’m sure someone creative could improve on the idea), but I don’t have to anchor them anywhere and they are easy(ish!) to move around if I want to switch things up.
That is, the wood is permanently in the bucket since I put concrete mix in it after sticking the wood in there.
Thanks for the instructions! The only change I made was with the “feet”: I attached them with countersunk lag bolts and then reinforced with gusseted brackets. It seemed to me that there could be a lot of torque on those feet, though no one has mentioned any problems. Thanks again!
Thanks for sharing such a good stuff. Your step by step information to create a hammock stand is really informative and simple to follow. It is a great option for anyone who has no option to hang a hammock in his house or lawn or in his garden. By the way thanks a lot for such a nice and informative information.Really i loved it
Was wondering if its possible to use 8″ bolts all around?
The bolts that we used ended up being quite long. So yes, shorter bolts will work.
This project finally inspired me to buy a corded drill and retire our ancient battery-powered one. After that, the task became much more fun! I’m not an experienced carpenter, so this felt like quite an accomplishment. I’m now ready to take on more projects around our new farm and then relax in the hammock when I’m done!
So glad to hear this! Enjoy your new hammock stand!
This is excellent information – thank you so much!
From where did you source your items? As I price at Home Depot the 12″ bolts are already getting close to the total cost you estimated for the whole project. Can you assist?
We got our supplies at Lowes. You can definitely use shorter bolts if you want.
Would this stand work for a Doublenest Eno Hammock? I have one but I don’t have any trees in my yard, would love to make this so I can have a little backyard oasis, I was just curious if anyone else had used it for an ENO hammock.
Thanks!
Yes, it will work. We have a similar type hammock that we use with the stand.
I think I just built a Viking longboat! I knew I was a ship builder in a former life. Thanks so much for the step-by-step and pictures. I didn’t have all of the materials on hand so improvised with YOUR great design. Built the frame in a couple of hours and got to lay in the hammock before calling it a night. There’s enough ‘bow and stern’ to attach a guide for mosquito net or sunsail.
Thank you again for sharing. Cheers!
So glad you found this useful! Hope you have many relaxing hours in your hammock!
Our hammock is 9 ft tip to tip. Has anyone used this size yet and what measurement changes did you make? Thanks!
My Sweetheart and I built ours last night and this morning. All done and we LOVE it! She loves it just a little more than I, she’s in it and I’m watching the race.
Thank you MUCH for sharing.
Thank you for the tutorial !
So helpful !
We used shorter bolts and it works fine.
The stand is lighter than expected, (which is a Gooood thing)
Looks stunning on our rooftop terrace.
Thanks Kelly
Thanks for the tutorial! Wondering if this works for a 12’ hammock?
Hi Renee… you would have to adjust the lengths of the boards to fit your hammock. I suggest laying your hammock out first to get the measurements you need.
4 6 inch bolts
4 10 inch bolts
8 treated 2x4x8
1 treated 2x4x6 for spacers
Small box of 2 1/2 inch deck screws
Use a 5/8 paddle bit so that you don’t risk splitting the lumber when hammering the bolts in. I cut all spacers at 8 inches
A great small tutorial, thanks for sharing the info Kelly
Will give this hammock stand a go this weekend, well written and easy to follow tutorial, thanks Kelly!