
How to Make Stickers with SVG Files
Learn how to make stickers with SVG files using your Silhouette machine! This step-by-step tutorial will teach you how.
SVG files have so many uses! You can use them to make customized clothing with heat transfer vinyl, fun mugs, or intricate paper cutouts. But did you know that you can make stickers with SVG files? I have to be honest, I never even considered this an option with SVG files but once I learned about it, I knew I had to share it.

WHAT ARE SVG FILES?
First things first… if you don’t know what I’m talking about when I say SVG files, take a look at this post first. It explains all the basics of what SVG stands for, what exactly SVG files are, and how you can use them.
WHERE TO FIND SVG FILES
There are many places to find SVG files. Here are a few of my favorites:
My Etsy Shop
Creative Market
So Fontsy
Hungry JPEG

STICKER SUPPLIES
- SVG file
- Silhouette machine
- Printable Sticker Paper or Printable Vinyl
- Printer
HOW TO USE PRINT THEN CUT TO MAKE STICKERS
For this tutorial, I’m going to use SVG files from my Mom Life SVG bundle to make stickers. If you don’t want to use the Mom Life files, you can find more SVG files at the sites I mentioned above or you can use an SVG file from the Silhouette Studio Library.
Once you have decided what SVG file you want to use to make your sticker, it’s time to get creating! For this tutorial, I’ll be using Silhouette Studio and a Silhouette Cameo. You can also use a Silhouette Portrait to make stickers.
Not a Silhouette user? No problem! You can make stickers with a Cricut machine! Check out this post to learn how to make stickers with a Cricut.
- Upload your SVG design
Open up your SVG file in Silhouette Studio by going to FILE>OPEN and navigate to where you have the design saved. If you are using a file from the Silhouette Studio library, click FILE>LIBRARY and select a file. Once your design is loaded onto the canvas, resize the file to the size that you want your sticker to be by clicking on the file and dragging the corners.
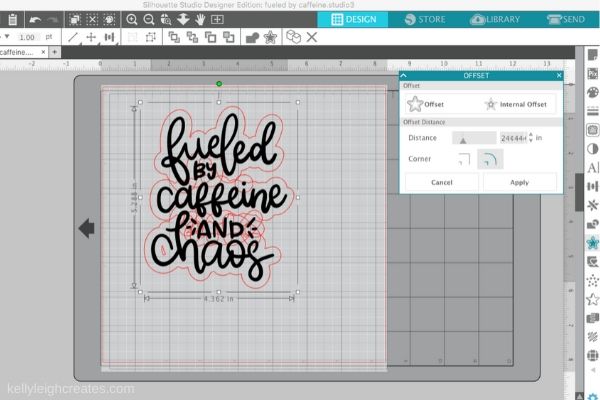
- Create an offset layer
Select your file and click the offset panel on the right side of the screen and use the offset feature make an offset around the SVG file. You can adjust the size of the offset by adjusting the distance. You can also choose whether you want rounded or sharp corners. Make your selections and hit APPLY. Set the offset line width to zero to ensure that the offset line does not print.

- Clean up the offset
After you use the offset tool, there may be some individual pieces left inside the design. To get rid of these pieces, hit OBJECT>RELEASE COMPOUND PATH. Now you can select those pieces and delete them. This step is optional and you may not have to do this depending on how your SVG file is set up.
- Add Color
If you want to change the color of the sticker text, open up the color panel on the right side of the screen, select the SVG file, and click on the color that you want. Please note that recoloring in this way will depend on the type of SVG file you are using for your sticker. Since I wanted all my text to be the same color, this method works. If you want your text to be different colors, you’ll have to ungroup the test and click on each word individually to change its color.
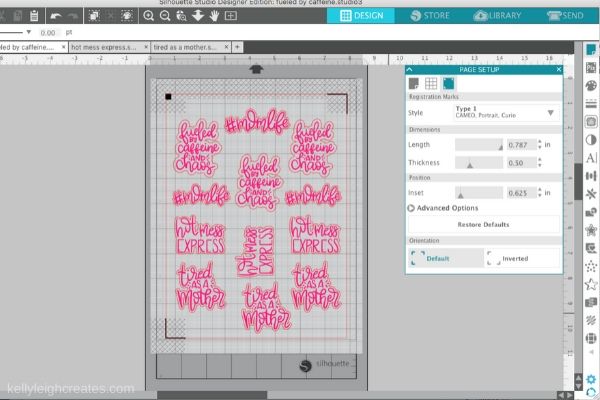
- Finalize file for printing
Arrange all your SVG files onto the canvas and add registration marks. To add the registration marks, open up the Page Setup Panel and click on the registration marks icon in the upper right. From the drop-down menu, choose Type 1. Once the registration marks are added, make sure all of your stickers are within the registration marks and hatched area. Anything outside of this area will not print.
- Send to printer
Send your sticker sheet to your printer by selecting File>Print. Make sure you have sticker paper loaded into your printer. I use Silhouette sticker paper. Your designs and the registration marks will print. The cut lines (offset) will not print because you have set the line width to zero. Make sure your printer settings are set to the highest quality possible.
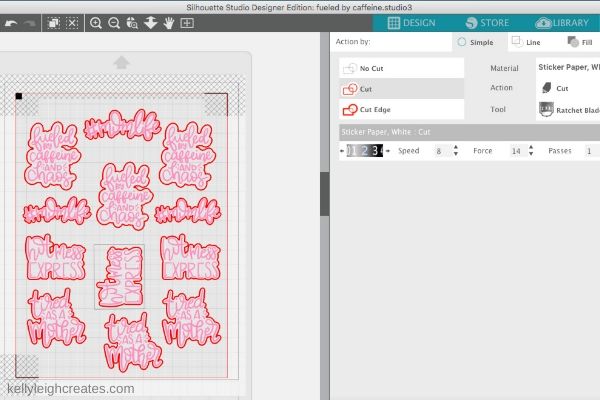
- Cut the stickers
Once you have printed your sticker sheet, the final step is cutting out your stickers. It’s very important that you do not adjust your file in Silhouette Studio after your stickers are done printing. If you make any adjustments, your stickers will not cut correctly.
Place your sticker paper onto a cutting mat and feed the mat into your Silhouette. Click on SEND in the upper right. In the Send Panel, make sure that only the outlines of your stickers are set to cut. Set the text to “no cut”. Set the material to white sticker paper. These settings will create a “kiss cut” meaning the blade will only cut through the top layer of the sticker paper.
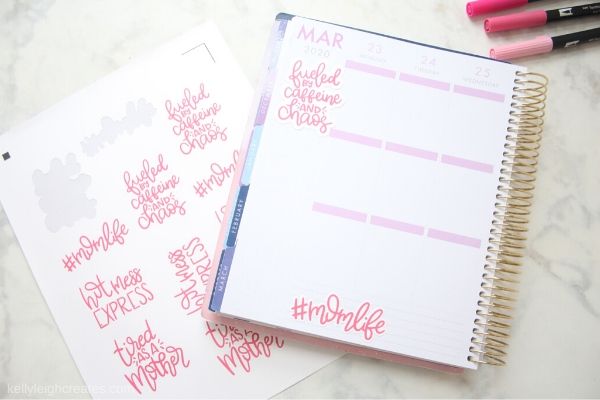
Click “send” at the bottom of the screen. The Silhouette sensors will scan the registration marks and then begin cutting around the offsets. - Enjoy your custom stickers!
Once your stickers are done cutting, remove the mat from the machine and now you’ve got your own die-cut stickers! Place your stickers in your planner, on a water bottle or anywhere else!


MORE POSTS YOU MAY LIKE
SVG FILE FAQs
How do I open these files in my Silhouette software?
Save the file to your computer. If it is a zip file, unzip it. Open your Silhouette software and select FILE>OPEN and navigate to where you saved the file. You can also import the file(s) to your Silhouette library by clicking FILE>LIBRARY>IMPORT TO LIBRARY and navigating to where you saved the file.
Can I open SVG files in the Silhouette Basic Edition?
No. You must have Silhouette Designer Edition or higher to open SVG files. If you have Silhouette Basic Edition, you can use PNG files and convert the PNG to a cut file.
Can this file be used with a Cricut?
Yes. Any SVG file can be used in Cricut Design Space
LOVE IT? PIN IT
What kind of sticker paper do you use? I’d like to use the glossy kind but my ink always smears.
Hi Cari! I use matte sticker paper from Online Labels. I would suggest trying waterproof sticker paper or printable vinyl.
What font are you using
It’s not a font. It’s hand-lettered.
Omg the lettering is so delicate and beautiful wish it was a font,truly a masterpiece
thank you
I have looked for the silhouette studio online and in App Store and I can’t seem to find what I’m supposed to be using? Also, which silhouette machine do I need? I want to make stickers!
Hi Stacie! You can download the software from the Silhouette website. You can make stickers with any of the machines.