
How to Make Stickers with Procreate and Silhouette
Create your own fun and unique stickers. It’s easy to make stickers using Procreate and Silhouette Studio. This tutorial will walk you through the process step by step.
I can think of anything more fun to create than original stickers. Stickers are everywhere… planners, laptops, everywhere. Since I’m not a big paper planner fan, my fave way of using stickers is to personalize water bottles. Previously I shared a tutorial on how to create stickers using SVG files but today I’m going to show you how to create a sticker using your own lettering created in Procreate. No SVG file needed.

I’m assuming that you already have a basic understanding of Procreate and will not be going over how to use the app in this tutorial. If you need a refresher, I suggest checking out the following posts.
BASIC PROCREATE POSTS:
How to Use Procreate: An Intro
How to Hand Letter in Procreate
SUPPLIES TO MAKE STICKERS
The following supplies are what I use in this tutorial. Please note that you do not need an iPad Pro. You just need a version of the iPad that will support the Procreate app. Also, the Apple Pencil is only needed if you want a pressure-sensitive stylus. The Apple Pencil allows you to create thick downstrokes and thin upstrokes depending on the amount of pressure that you place on the stylus.
If you want to make waterproof stickers that will be applied to things such as water bottles, I recommend printing on waterproof vinyl. If not, I recommend white matte sticker paper.
HOW TO CREATE STICKERS WITH PROCREATE AND SILHOUETTE
- Design your sticker in Procreate. I used the design from my 70s lettering tutorial for this sticker but just changed up the colors.
- Export your design as a PNG to your computer. Make sure that the background layer is turned off in Procreate before you export so your design will have a transparent background.

- In Silhouette Studio, create 2 rectangles, each 4.6″ x 6.4″. These will be your sticker sheet templates
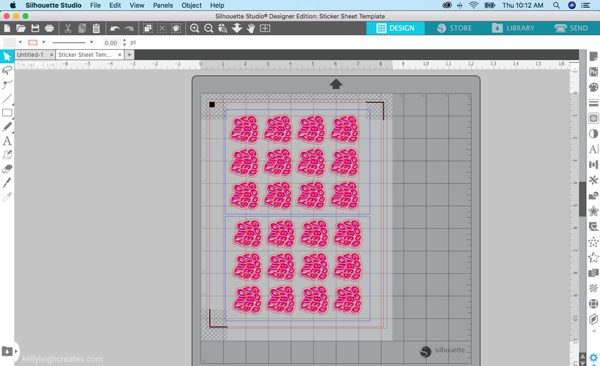
- Open up your design in Silhouette Studio and resize it to maximize the amount of stickers that you can place on your templates.
- Create an offset around your design. This offset will be where the Silhouette machine cuts. The bigger the offset, the more white space you’ll have surrounding your design. Set your offset lines to a different color than the rectangles for the sticker sheets.
- Duplicate your design to fill the template. Turn on the registration marks.
- Send your design to your printer on sticker paper. The design and registration marks will print.
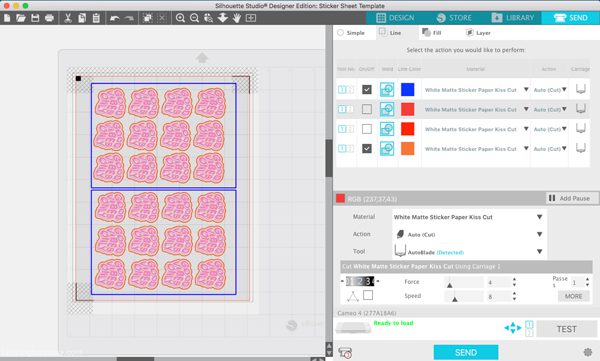
- Once your design is printed, place the sticker paper on your cutting mat and choose the sticker paper cut setting in Silhouette Studio for the offset. This will create a kiss cut meaning the blade will not cut through the backing of the sticker. Adjust the blade to a deeper cut for the outline of the sticker sheet (shown in blue below).
- Send your design to cut. Silhouette will scan the registration marks first and then cut out the sticker sheets.


MORE PROCREATE TUTORIALS
- How to Create Color Palettes in Procreate
- Two Ways to Overlay Lettering onto Photos using Procreate
- How to Draw 70s Style Lettering in Procreate
- How to Create SVG Files using Procreate
- How to Draw 3D Lettering in Procreate
- How to Create Blended Backgrounds in Procreate
- How to Install Brushes into Procreate
- How to Create Rainbow Lettering in Procreate
- How to Create Watercolor Brush Lettering in Procreate

Do you need to use a laser printer?
No. An inkjet printer is all you need.
Do you have more tutorials on using Silhouette? Is there a way to make silhouette cut all the way through to separate all the stickers?