
The Easiest Way to Apply Vinyl to a Mug

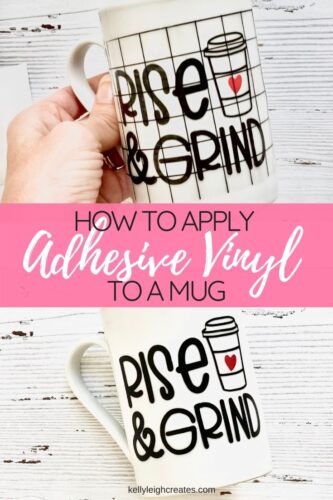
Learn the easiest way to apply vinyl to a mug in this step-by-step tutorial. You’ll learn the tips and tricks I use to make beautiful DIY cups every time.
Last week I shared some fun coffee-themed SVG files. Let me tell you, I just cannot live without my coffee. It’s the first thing I reach for in the kitchen each morning. So what better project to make with a coffee-themed SVG file than a coffee mug? In this tutorial, I’m going to give you step-by-step instructions on how to put vinyl on a cup. Personalized cups and mugs are fun DIY projects and are great gifts.

If you are new to the world of SVG files, the posts below will give you some introductory information on how to use SVG files and a Silhouette Cameo. The tutorial below also works with a Cricut so for those of you on team Cricut… this post is for you too!
BASIC SVG & SILHOUETTE STUDIO POSTS
- How to Use Silhouette Cameo 4: A Guide to Getting Started
- How to Use SVG files: Tips, Tricks & Ideas
- How to Import Files Into Silhouette Studio
- How to Weed Vinyl
- How to Cut By Color in Silhouette Studio
- How to Separate SVG files into Layers
First things first, let’s go over the supplies that you’ll need to put vinyl on a cup.
DIY MUG SUPPLIES
- Mug, cup, or tumbler (stainless steel mugs, water bottles, and ceramic mugs work best)
- Oracal 651 Permanent Vinyl – I get my vinyl from Expressions Vinyl.
- Silhouette or Cricut
- Cutting Mat – (Silhouette / Cricut)
- Weeding hook and scraper tool
- Transfer Tape
- Painters tape
- Rubbing alcohol
- Cotton pad
- Tape measure
- Mod Podge dishwasher safe sealer (optional)
- Coffee SVG -available in my resource library which is free for my email subscribers. If you don’t want to use the coffee-themed SVG file, I have numerous other free SVG files.
I also recommend these sites for SVG files:
Kelly Leigh Creates Shop
Kelly Leigh Creates Etsy
Design Bundles
Creative Fabrica
Creative Market
So Fontsy

WHAT TYPE OF VINYL IS BEST FOR A CUP?
When you are putting vinyl on a cup or mug, I always recommend using permanent adhesive vinyl. My go-to vinyl is Oracal 651. Oracal 651 is an outdoor vinyl that is weather-resistant. It has a longer-lasting adhesive than non-permanent (removable) vinyl. This makes it the ideal vinyl to use for items that are going to get wet. It is easy to cut and weed and I have never had any issues using it on cups or mugs. I do not recommend using removable vinyl.
HOW TO GET VINYL TO STAY ON CUPS
Let’s talk about how to make sure your vinyl stays on your cup. The last thing you want is to spend time making your mug only to have the vinyl peel off. To ensure that the vinyl stays put, be mindful when choosing fonts and designs for your vinyl decal. Thinner fonts and intricate designs are less likely to stick over time because of the lower amount of surface area on the sticky side of the design. Choose designs with thick lines and chunky fonts to make sure there is plenty of sticky adhesive in contact with the cup. The design that I am using in this tutorial has been on my mug for a few years and there is no sign of peeling. Yes, the outline of the coffee cup is thin and if I did it over again, I would probably choose something thicker.
The second reason the vinyl may peel is if you run your cup through the dishwasher. Always hand wash your cup unless you seal it. I know that it may be convenient to just throw it in the dishwasher but I promise if you take the time to hand wash it, it will last longer.
HOW TO PUT VINYL ON A CUP
- Clean your mug or cup and then wipe it down with rubbing alcohol. This removes all the dirt, grease, and residue and gives the vinyl a clean surface to stick to. Dry your cup with a cotton pad.
- Using a tape measure, Measure the area on your mug where you want to place your design.
- Upload your SVG file to Silhouette Studio or Cricut Design Space and size it according to your measurement.
- Place the adhesive vinyl onto your cutting mat with the backing side down.
- Cut out the SVG with your Silhouette or Cricut machine onto adhesive vinyl. I highly recommend permanent outdoor vinyl for this project since you will be washing your mug. Always make sure to do a test cut first and adjust your blade settings if needed.

- After your design is cut, unload your cutting mat from the machine and use a weeding hook to weed the excess vinyl from your vinyl design.
- Apply a piece of transfer tape over your SVG file and use a scraper tool to burnish the vinyl to the transfer tape.

- Center your design onto your mug and use a few pieces of painter’s tape to tack down the top and bottom of your design.

- Lift up one side of the design and peel the vinyl backing away from the SVG file. Cut the excess vinyl backing off.
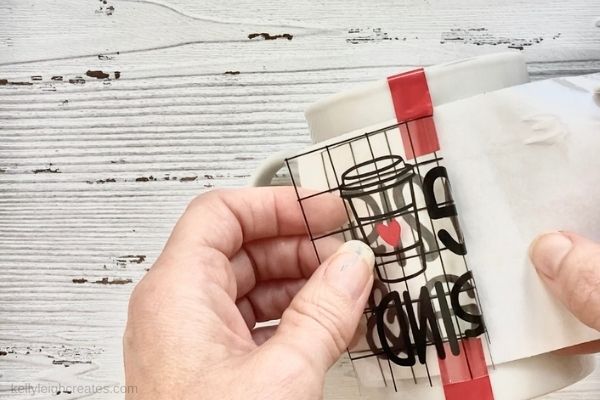
- Place the transfer tape back down onto the mug and smooth the design onto the cup with your fingers, starting from the middle and working your way out to get rid of any bubbles. This method of applying vinyl is called the hinge method. This method works well on a curved surface like a mug.

- Repeat this process for the other side of the design.
- Once the entire design is placed down, burnish it with the scraper tool.
- Slowly remove the transfer tape.

- Let your mug sit for 48-72 hours before washing. Always hand wash.
HOW TO MAKE YOUR MUG DISHWASHER-SAFE
I always recommend hand washing your cups, mugs and tumblers that have vinyl on them. However, if you want to make your cup dishwasher safe, you can apply a coat of Mod Podge Dishwasher Safe sealant. To use this sealant, apply thin coats to your mug using a sponge brush to reduce brush strokes. You’ll want to work quickly because the sealant dries quickly and you want the entire surface of your mug to be even. You’ll need to cover the entire surface of the cup (not just where the vinyl decal is). There is no need to seal the inside of your cup. Sealant looks best on light-colored cups. It can leave a hazy look on dark cups.
DO YOU NEED TO SEAL PERMANENT VINYL ON A MUG?
No. You do not need to seal your cup if you don’t want to take that step. As long as you leave your vinyl to cure for 48-72 hours and always hand wash it, it should last for quite a while.
If you learn better through video, you’re in luck because I’ve created a short video showing this process.
MORE VINYL TUTORIALS
The Easiest Way to Layer Vinyl Perfectly Each Time
How to Weed Vinyl: 5 Must-Know Tips
LOVE IT? PIN IT!
