How to Cut Heat Transfer Vinyl with a Silhouette
Learn how to cut heat transfer vinyl with a Silhouette machine. Make fun projects like clothing, bags, hats and more!
I make a LOT of projects using vinyl. My favorite type of projects to make using heat transfer vinyl and my Silhouette machine are shirts. I love creating fun cut files and then pairing the cut files with heat transfer vinyl to create custom shirts that nobody else has. Using heat transfer vinyl is different than cutting regular adhesive vinyl and can be tricky if you don’t know what you’re doing. There are a few additional steps involved but don’t worry… I’m here to make the process super easy.
HOW TO CUT HEAT TRANSFER VINYL WITH A SILHOUETTE
Before you cut heat transfer vinyl, you’re going to need some supplies:
- Siser Easyweed – I like to get my vinyl from Expressions Vinyl. They have good prices and fast shipping. Plus, you can join their vinyl rewards program and get points towards future purchases every time you shop.
- Weeding tools – my weeding tools are from Cricut but Silhouette sells some as well.
- Cut files – if you want to design your own cut files, I have a tutorial on how to design cut files in Illustrator. If you don’t want to design your own, I have numerous free cut files or here are several sites that I recommend to purchase cut filesKelly Leigh Creates Shop
Creative Market
Design Cuts
So Fontsy
SETTING UP THE FILE
Open your SVG file or create your own in Silhouette Studio and size it to the appropriate size for your project by clicking and dragging the corner handles. Make sure to hold shift to keep the proportions correct.
If you plan to cut your design out of multiple colors of vinyl, you’ll need to first separate the SVG file into layers if it is not already separated like you want to cut it. After you have separated it, you can fill each layer with a different color in order to cut by color.
When you create a design to be used with heat transfer vinyl, you need to make sure to mirror the design before you cut it. This means that you have to flip the design so that it is backward. The reason for this is because heat transfer vinyl comes on a carrier sheet with the vinyl attached. The design needs to be cut out of the vinyl and then everything gets flipped over to adhere the vinyl to the surface. If you do not mirror your image, the side with the adhesive will be on the wrong side of the design and you won’t be able to adhere the design to your fabric.
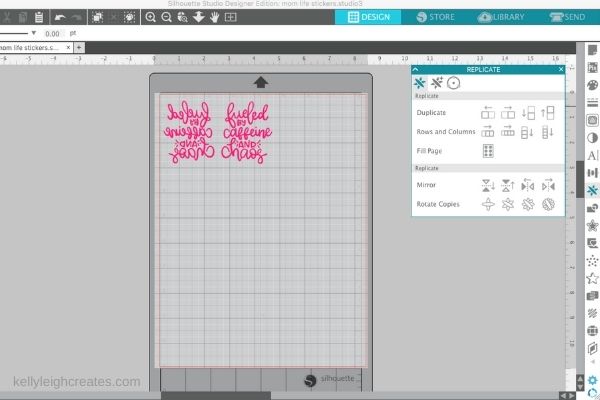
- Create your design in Silhouette Studio. Open the replicate panel and click on “mirror”. This will create a mirrored imaged of your design. Keep the mirrored image and delete the original image.
- Place a piece of heat transfer vinyl onto the cutting mat, carrier sheet down. You can tell which side the carrier sheet is because it is glossy/shiny.
CUTTING THE HEAT TRANSFER VINYL
- Load the cutting mat into the Silhouette.
- In Silhouette Studio, click “Send”.
- Set the vinyl settings to the appropriate HTV and set your blade accordingly. These default settings will create a “kiss cut” meaning that the blade will cut through the vinyl but not all the way through the carrier sheet.
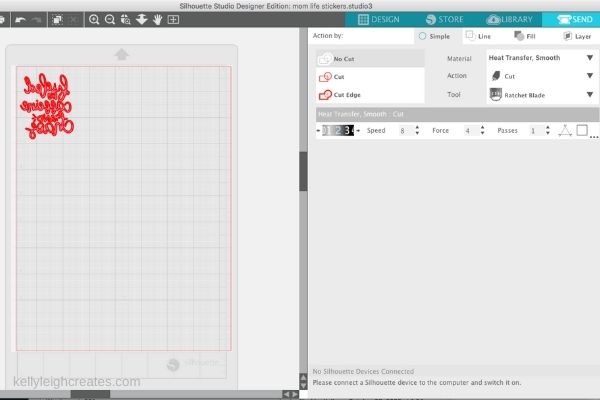
- Click “Cut”. You will get a message that asks if you want to mirror the design or send it as is. Since you have already mirrored it, select send as is.
- Once the design is finished cutting, remove the mat from the Silhouette.
- Weed the excess vinyl from the carrier sheet.
- Flip the design over and it is ready to be adhered to your surface.
So that’s how to cut heat transfer vinyl with a Silhouette machine. I hope you found this tutorial helpful and don’t forget to check out more heat transfer vinyl tutorials below.
MORE HEAT TRANSFER VINYL TUTORIALS
A Beginner’s Guide to Heat Transfer Vinyl
The Best Way to Layer Heat Transfer Vinyl
Reverse Canvas with HTV
Wood Slice Ornaments with HTV
LOVE IT? PIN IT!