
How to Create a Knockout Design in Silhouette Studio
Learn how to create a knockout design in Silhouette Studio. The knockout method adds depth and dimension to your projects by embedding one design into another.

Creating knockout designs in Silhouette Studio opens up so many possibilities. By combining different elements and text with the knockout effect, you can uplevel your designs and create some super unique projects.
BASIC SVG & SILHOUETTE STUDIO POSTS
- How to Use Silhouette Cameo 4: A Guide to Getting Started
- How to Use SVG files: Tips, Tricks & Ideas
- How to Import Files Into Silhouette Studio
- How to Weed Vinyl
- A Beginner’s Guide to Heat Transfer Vinyl
- How to Cut By Color in Silhouette Studio
- How to Separate SVG files into Layers
WHAT IS A KNOCKOUT DESIGN?
A knockout design involves overlapping two or more objects, where one object acts as a cutout to reveal the underlying object. The cutout portion removes the shape or design from the top layer, exposing the shape or design beneath it. This technique allows you to combine different colors, patterns, or textures to create intricate designs.
EXAMPLE OF A KNOCKOUT DESIGN
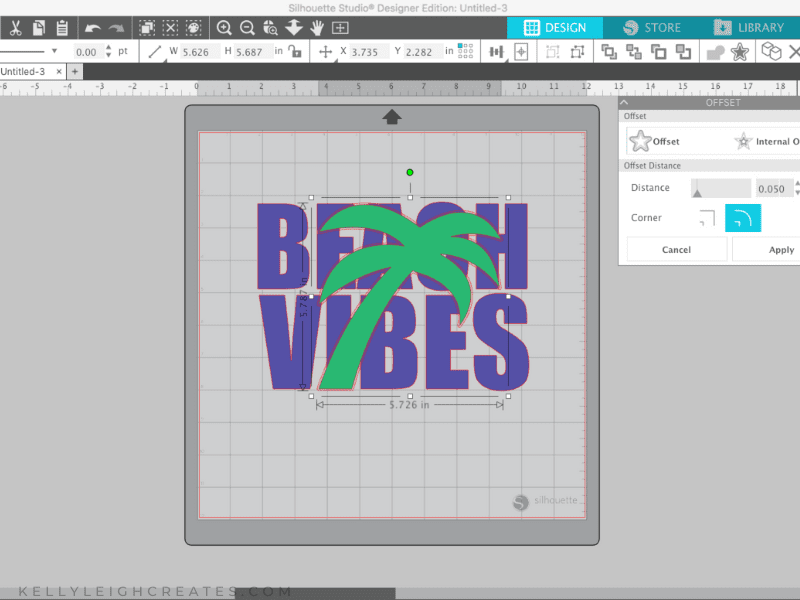
The image shown above is an example of a knockout design and this is the design that I will be showing you how to make today. You can see that the palm tree is embedded into the “beach vibes” text. This design would look great on a t-shirt or a beach bag.
- ADD TEXT – Type the text that you want. For this design, I typed out “Beach Vibes” using the Impact font. I chose this font because it is big and chunky and works well with knockout design creations. Make the text a compound path by selecting it and clicking OBJECT>COMPOUND PATH from the dropdown menu. Add color to the text with the color panel.

- OVERLAY A DESIGN – Overlay a palm tree onto the text and size it so that it covers the text but does not extend past it. The palm tree that I used is a file that came with the Silhouette Cameo 4. I modified the file by taking out the coconuts and welding everything together.
- CREATE AN OFFSET – Select the palm tree and open up the offset panel. Create an offset and click apply.
- CREATE A COPY – Select the palm tree (not the offset) and text, hit CMD/CTRL- C and then CMD/CTRL – F to paste in front
- CROP – With the copy selected, open the modify panel and click “crop”. Then select “compound path” This crops the palm tree into the text. You can see this better in the image below where I switched the palm tree color to red.
- SUBTRACT – Select the remaining text and the palm tree offset. In the modify panel, select “Subtract” and then “Make” under “Compound Path” This subtracts the offset from the text so there is a gap between the palm tree and the text. Delete the original palm tree (green in the image below) and you’re done!


Now all that is left is to cut out the file onto heat transfer vinyl and place it on your shirt.
HOW TO CREATE A KNOCKOUT DESIGN IN SILHOUETTE STUDIO


SVG FILE FAQs
How do I open these files in my Silhouette software?
Save the file to your computer. If it is a zip file, unzip it. Open your Silhouette software and select FILE>OPEN and navigate to where you saved the file. You can also import the file(s) to your Silhouette library by clicking FILE>LIBRARY>IMPORT TO LIBRARY and navigating to where you saved the file.
Can I open SVG files in the Silhouette Basic Edition?
No. You must have Silhouette Designer Edition or higher to open SVG files. If you have Silhouette Basic Edition, you can use PNG files and convert the PNG to a cut file.
Can this file be used with a Cricut?
Yes. Any SVG file can be used in Cricut Design Space