
How to Use the Offset Tool in Silhouette Studio
Learn how to use the offset tool in Silhouette Studio. This post will step you through everything you need to know about the offset tool so you can start using it to make beautiful projects.
Today we’re diving into the techy part of crafting. But don’t worry… just because it’s tech doesn’t mean it’s hard. I share a ton of SVG files on this site and I find that a lot of people love SVG files but don’t really understand how to work with the software required to use those files. And that’s what I am here for… to teach people the software in an easy-to-understand way. Today’s post is all about the offset tool in Silhouette Studio. What it is, where to find it, and how to use it.

WHAT IS THE OFFSET TOOL?
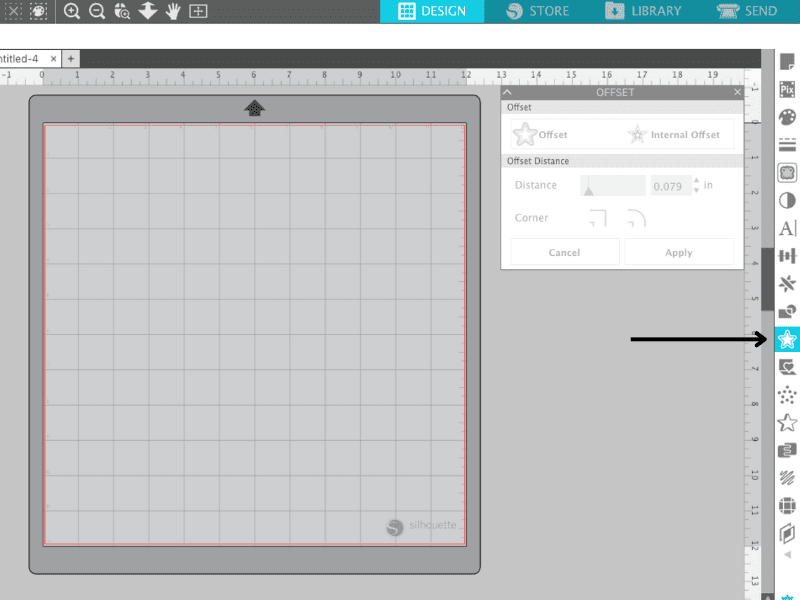
The offset tool is a function in Silhouette Studio that allows you to add a buffer (or offset) around text or shapes. The offset tool is located in the tool panel on the right side of the screen. It looks like a star with an outline. When you click on it, the offset panel pops up and you can choose internal and/or external offset and the size of the offset.
USING THE OFFSET TOOL IN SILHOUETTE STUDIO WITH FONTS
Silhouette Studio allows you to use any font that you have installed on your computer. And yes, this includes fonts that have special characters like swashes. However, not every font on your computer is the best for cutting. Learn which types of fonts are the best to use in this post.
The offset tool is good to use when you want to increase the thickness of fonts to make them cut easier with the Silhouette. Thin fonts are not ideal for cutting machines but a lot of the more popular fonts are thin. Think script fonts that are popular on farmhouse signs. By using the offset tool, you are able to make these fonts a bit thicker so they will be easier to cut. To use the offset with fonts, click on your text and then click on the offset tool. Increase the numbers using the up and down arrows to increase or decrease the offset. Once you get the offset to the size that you want, click apply. Then you can move the original text out of the way and you’re left with just the offset.

SVG FILES & THE OFFSET TOOL IN SILHOUETTE STUDIO
Before we talk about using the offset too with SVG files, I want to give you some basic info on what an SVG file is and what it is used for. SVG stands for scalable vector graphic. You may hear the term SVG used interchangeably with cut file. An SVG is scalable, meaning you can scale it up super big and it won’t lose resolution because it is in vector format and not raster. For comparison, JPEGs are raster files (made of pixels) which is why they get blurry when you enlarge them too much. Here is an overview post on the basics of SVG files and how to use them. If you are interested in creating your own SVG file inside Silhouette Studio, this tutorial will show you how to create a basic file.
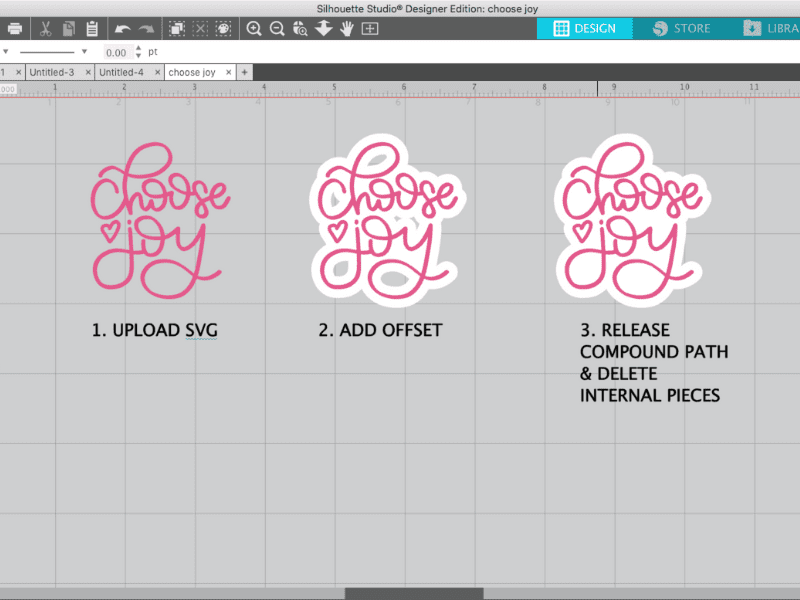
Offsets are great to use when you’re making stickers with the print and cut feature of the Silhouette machine. If you need a full print and cut tutorial, you can find it here. I use offsets with stickers when I want a white border around the sticker. The process for creating an offset around an SVG file is the same as using the offset tool with a font. Simply upload & select the SVG file, click the offset tool and change the offset size with the up and down arrows. Once you hit “apply”, there may be some “extra” pieces that need to be deleted. To delete those pieces, click “OBJECT>RELEASE COMPOUND PATH” and you’ll be able to delete each piece individually. Now you’ll have a perfect offset around your sticker design.
I hope this post has given you a good overview of how to use the offset tool in Silhouette Studio. If you found this post useful, please consider sharing it!

MORE SVG & SILHOUETTE STUDIO POSTS
- How to Use Silhouette Cameo 4: A Guide to Getting Started
- How to Use Silhouette Studio: Everything You Need to Know
- How to Import Files Into Silhouette Studio
- How to Trace By Color
- How to Convert a PNG or JPEG to a Cut File
- How to Cut By Color in Silhouette Studio
- How to Separate SVG files into Layers
SVG FILE FAQs
How do I open these files in my Silhouette software?
Save the file to your computer. If it is a zip file, unzip it. Open your Silhouette software and select FILE>OPEN and navigate to where you saved the file. You can also import the file(s) to your Silhouette library by clicking FILE>LIBRARY>IMPORT TO LIBRARY and navigating to where you saved the file.
Can I open SVG files in the Silhouette Basic Edition?
No. You must have Silhouette Designer Edition or higher to open SVG files. If you have Silhouette Basic Edition, you can use PNG files and convert the PNG to a cut file.
Can this file be used with a Cricut?
Yes. Any SVG file can be used in Cricut Design Space