
How to Create SVG Files in Silhouette Studio
Learn how to create SVG files directly in Silhouette Studio with this easy tutorial.
Previously, I posted about creating SVG files in Illustrator but I know that you may not have Illustrator or maybe you have it but haven’t gotten the time to learn how to use it. Did you know that you do not need Illustrator to create SVG files? You can create SVG files in Silhouette Studio. No Adobe Illustrator experience necessary!

First things first. Here are some basic posts on SVG files, vinyl, and Silhouette Studio.
BASIC SVG & SILHOUETTE STUDIO POSTS
- How to Use Silhouette Cameo 4: A Guide to Getting Started
- How to Use SVG files: Tips, Tricks & Ideas
- How to Import Files Into Silhouette Studio
- How to Weed Vinyl
- A Beginner’s Guide to Heat Transfer Vinyl
- How to Cut By Color in Silhouette Studio
- How to Separate SVG files into Layers
WHAT IS AN SVG FILE?
Before I get into how to create SVG files in Silhouette Studio, I want to go over what exactly an SVG is. SVG stands for scalable vector graphic. SVG images are in vector file format instead of raster. Vector graphics are comprised of points whereas raster image formats are comprised of pixels. Examples of raster graphics include JPEG and PNG files. The big difference between vector and raster is that vector files can be scaled up without losing resolution. Raster images lose resolution and become blurry if they are scaled up (enlarged) too much. Because vector graphics can be scaled up, they can be placed on something as small as a business card or as large as a billboard and the resolution will be the same.
WHAT PROGRAMS CAN CREATE SVG FILES?
There are many different programs that can be used to create SVG cut files. Most professional graphic designers create SVG files using Adobe Illustrator. Unfortunately, to access Adobe products, you need to purchase a subscription which can get quite expensive. Creating SVG files in Silhouette Studio allows you to create SVG files more affordably. In addition to Silhouette Studio, there is a free program called Inkscape. that allows you to convert PNG and JPEG images into SVG format. I have not used Inkscape but I know many designers that do. This post will focus on creating SVG files from scratch directly in the Silhouette Studio software.
HOW TO CREATE SVG FILES IN SILHOUETTE STUDIO
In order to create SVG files in Silhouette Studio, you will need to have the Business Edition of Silhouette Studio. You can open SVG files with Designer Edition but in order to save them as an SVG file after designing and/or modifying, you need Business Edition.
Today I’m going to show you how to create an ice cream cone SVG file. Once you learn the tools needed and basic steps, you will be able to create more complicated SVG designs.

STEP 1
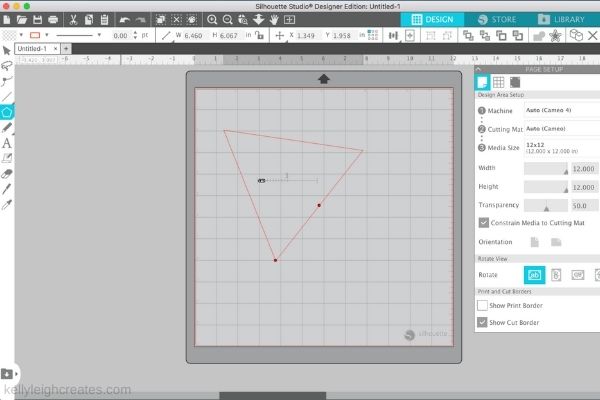
Open up Silhouette Studio and set your cutting mat to the appropriate size. On the left-hand toolbar, select the Drawing Tools and the Polygon Tool. Draw out a polygon and use the slider to change the number of sides to 3 to form the cone.
STEP 2
Click on the shape an convert it to a path by clicking on the polygon in the toolbar at the top of the screen. This changes the triangle from a shape to a path and now the points of the path are editable. Use the Edit Points tool in the left sidebar to edit the points on the triangle to make the triangle tall and skinny. Click the two points at the top and drag them in.

STEP 3
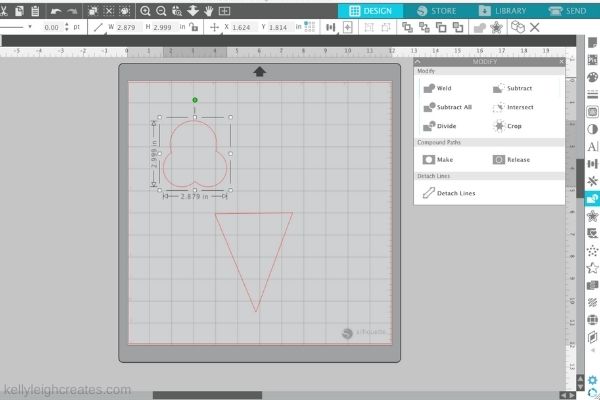
Use the ellipse (located in the Drawing Tool panel) to draw 3 circles. Hold down shift while you click and drag to make a perfect circle. Position the circles as shown below so they overlap. These will become the scoops of ice cream.

STEP 4
Click to select all three circles, open the Modify panel (right side of screen) and select “Weld” to weld the circles together. When you weld items together, they cut out as one shape instead of individual shapes.
STEP 5
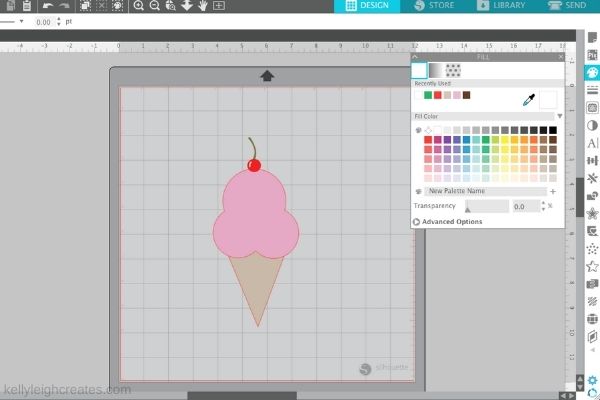
Draw a cherry using the ellipse tool and the stem using the freehand tool. The freehand tool is located right below the Drawing Tools on the left side of the screen. Do not weld the items of the cherry together since you want to cut out each piece separately.
STEP 6
Using the Color Fill Panel, fill each shape with a color. Select each shape one by one, open the Color Fill panel, and click on the color that you want the shape to be. This will allow you to cut by color. If you would like to see exactly how the design will be cut, hit the “Send” button in the upper right. Each color represents a separate layer of the SVG design.

STEP 7
When you are happy with your design, you’re ready to save/export it as an SVG file. Click FILE>SAVE AS from the top dropdown menu and choose the SVG option. Again, you will need the Business Edition of Silhouette Studio to do this.If you do not have Business Edition, you will only be able to save it as a .studio file.
I hope you found this tutorial useful! Make sure to check out the video below if you learn better by seeing the steps laid out.

MORE SILHOUETTE TUTORIALS
- How to Use Silhouette Studio: Everything You Need to Know
- How to Separate SVG Files in Layers in Silhouette Studio
- How to Cut Multiple Colors of Vinyl with the Silhouette
- How to Use the Weld Tool in Silhouette Studio
- How to Use the Offset Tool in Silhouette Studio
SVG FILE FAQs
How do I open these files in my Silhouette software?
Save the file to your computer. If it is a zip file, unzip it. Open your Silhouette software and select FILE>OPEN and navigate to where you saved the file. You can also import the file(s) to your Silhouette library by clicking FILE>LIBRARY>IMPORT TO LIBRARY and navigating to where you saved the file.
Can I open SVG files in the Silhouette Basic Edition?
No. You must have Silhouette Designer Edition or higher to open SVG files. If you have Silhouette Basic Edition, you can use PNG files and convert the PNG to a cut file.
Can this file be used with a Cricut?
Yes. Any SVG file can be used in Cricut Design Space
LOVE IT? PIN IT!

Interesting on learning some new tools