
How to Use Masks In Procreate: Clipping Masks, Layer Masks, Alpha Lock
Confused about masks in Procreate? Learn how to use clipping masks, layer masks and alpha lock and the differences between them.
I absolutely adore the Procreate app. It has taken my hand lettering to the next level. There are many features in the Procreate app and sometimes it gets confusing on when or how to use each feature. Today I’m going to explain 3 features that are game-changers: clipping masks, layer masks and alpha lock. I’ll explain what each feature is, the pros and cons of each, and show you how to use each feature.
If you haven’t already checked out my intro to procreate post, you may want to read that one first. The info in this post is a little more advanced so make sure you have a basic understanding of Procreate first before you dive into this.
WHAT ARE MASKS?
A mask is a layer that is used to edit artwork in a non-destructive way, meaning you can easily undo the mask and restore the artwork back to its previous state. There are two types of masks in Procreate: the clipping mask and the layer mask.
HOW TO USE MASKS IN PROCREATE
WHAT IS A CLIPPING MASK?
A clipping mask is a layer that is placed above the part of the image that you want to alter in your artwork. Anything you draw or insert on the clipping layer will be constrained to the layer directly beneath it.
HOW TO USE A CLIPPING MASK
To use a clipping mask in Procreate, create a new layer above the base layer that you want to edit. Tap the new layer and tap “clipping mask” from the layer options menu menu to turn the layer into a clipping mask. When you add color, texture, or a design to the clipping mask layer, it will be constrained to the layer just below it. You can place additional layers of clipping masks on top of your bottom layer and everything will be clipped to that layer.
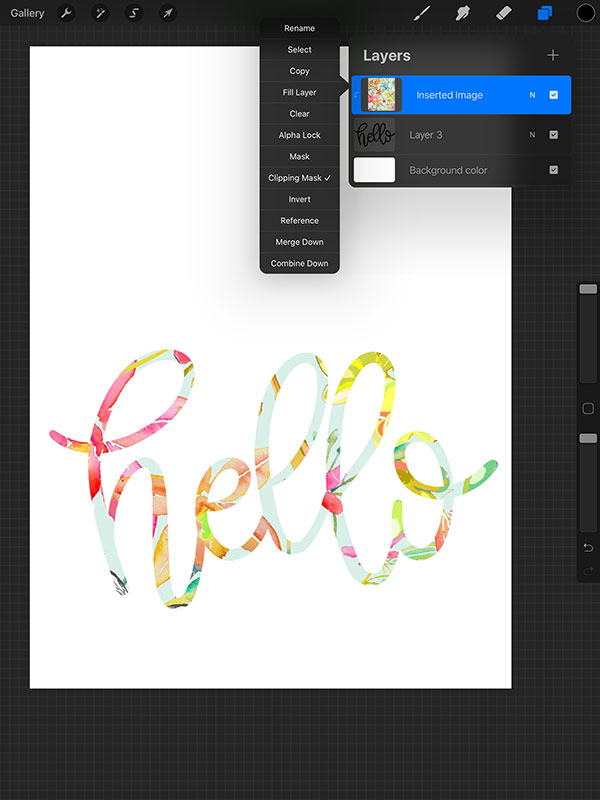
In the example below, you can see that you don’t have to use a solid color. I used a floral design and clipped it to the text layer. In the flyout menu, the “clipping mask” option is checked.
WHAT IS A LAYER MASK?
A layer mask is a layer that is used to hide/conceal a part of the artwork.
HOW TO USE A LAYER MASK
To use a layer mask in Procreate, select the layer your artwork is on and choose “mask” from the layer options menu. This will place a layer mask above your artwork.
QUICK TIP: BLACK CONCEALS, WHITE REVEALS
Next, draw on the layer mask layer with a black brush to conceal a portion of the layer. Choose a brush and draw on the layer mask with black to hide pieces of the artwork on the layer beneath the layer mask. If you mess up and hide too much, simply change your brush color to white and paint over it to reveal the artwork again.
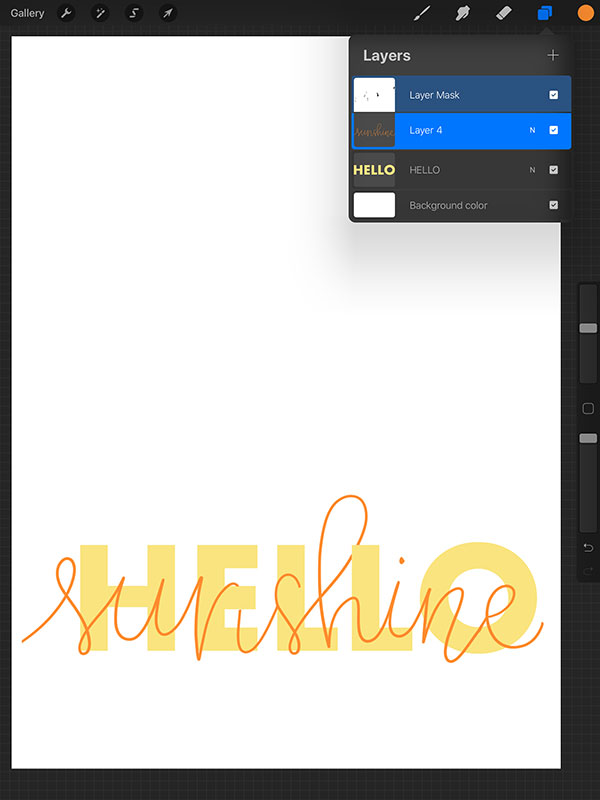
In the example below, I used a layer mask on the word “sunshine” to make it look like it is intertwined with the “e” and “l” of the word “hello”. I used a black brush on the layer mask to hide portions of the word “sunshine”.
ALPHA LOCK IN PROCREATE
WHAT IS THE ALPHA LOCK FEATURE?
Alpha lock is a feature that I used to use a lot before I understood clipping and layer masks. It is a quick way to add color or pattern to one specific layer. I recommend using it sparingly because it is a form of destructive editing and the less destructive editing you can do, the better. I’m still going to explain how to use it and then you can decide whether you want to use it in your digital art.
HOW TO USE ALPHA LOCK
Select the layer you want to edit and tap alpha lock from the flyout menu. A checkered background will appear on your layer in the layer panel. This is how you know it has alpha lock enabled. Whatever you draw will be constrained to the layer. However, unlike a clipping mask, you are drawing ON your actual layer and not on a separate layer. Because of this, you cannot undo the edits if you change your mind later.
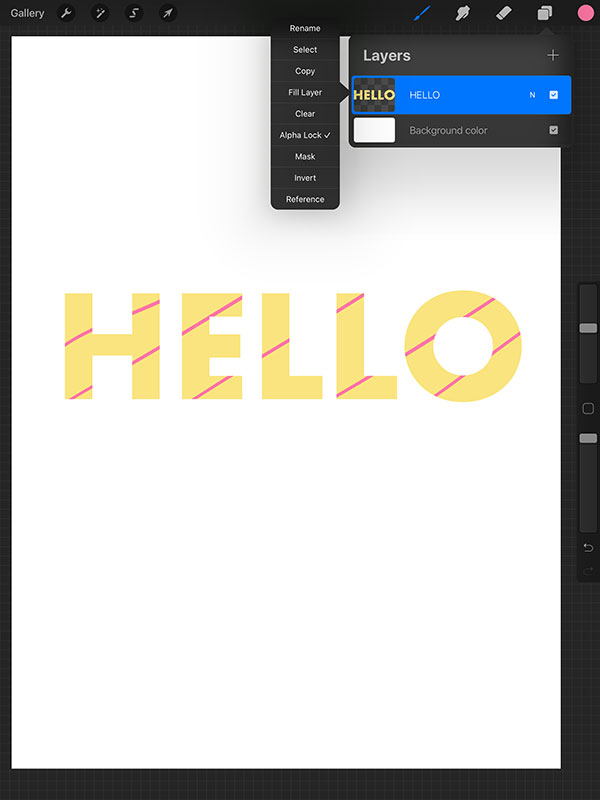
In the example below, I set the text layer to alpha lock and then drew pink stripes on it.
THE PROS AND CONS OF EACH METHOD
Clipping masks and layer masks are both forms of non-destructive editing which means that you are not destroying/damaging your original piece of artwork during the process. You are simply layering the effects onto your artwork and those layers can be modified without changing your original artwork.
CLIPPING MASK PROS
- Non-destructive
- Can be layered
- Can add diffeent colors to clipping mask layer
CLIPPING MASK CONS
- Adds additional layer to layer count
LAYER MASK PROS
- Non-destructive
LAYER MASK CONS
- Adds additional layer to layer count
- Can only erase and add back to layer. Cannot add another color to layer.
ALPHA LOCK PROS
- Very quick way to edit
- Can use any color or pattern
ALPHA LOCK CONS
- Destructive editing
Now that you know the differences between clipping masks, layer masks, and alpha lock and when to use each function, be sure to check out more of my Procreate tutorials below.
MORE PROCREATE TUTORIALS
- How to Create Color Palettes in Procreate
- Two Ways to Overlay Lettering onto Photos using Procreate
- How to Draw 70s Style Lettering in Procreate
- How to Create SVG Files using Procreate
- How to Draw 3D Lettering in Procreate
- How to Create Blended Backgrounds in Procreate
- How to Install Brushes into Procreate
- How to Create Rainbow Lettering in Procreate
- How to Create Watercolor Brush Lettering in Procreate
LOVE IT? PIN IT!

Thank you for this tutorial!
I’m trying to go one step further I have a photo, I want to take out a rectangle at the bottom, and insert text, but make the text clipped to the photo. I can’t wrap my head around the steps/layers. I think this is something I would do often, so that the text stands out on the picture, but isn’t just a solid colour text
Hi Tracy. I’m not quite sure the result that you are trying to achieve. If you want the photo to show through the text, you would clip the photo to the text layer. If you want the text to stand out on the photo, I would suggest adding a drop shadow to the text with this tutorial: https://kellyleighcreates.com/add-shadows-to-lettering-in-procreate/
I think I understand what you mean. Basically you’re creating a kind of stencil over the picture with the words, like if you were to take a piece of paper, cut out the word in the centre and then lay the piece of paper over the picture. There’s a couple ways I can think of to achieve this, but this one is easier to describe. Have one layer as your photo. On a second layer create the rectangle (you could also erase a rectangle shape on the photo layer itself if your wanting the the rectangle to be transparent. On another layer create your word design. Create one more final layer with the photo (you will have two photo layers). Set that top photo layer to clipping mask and the photo will be in the word just as in the example above. That word will then in turn be over the rectangle which will be over the original photo
This is a good explanation. Thank you!
Thank you for this! This is exactly the explanation I was needing to come across!
This is the single best, most clear explanation of masking! Thanks so much for this!
Thanks so much, Beth! I’m glad the post helped you.