
How to Use Hand Lettering Practice Sheets in Procreate
Are you new to iPad lettering and want to learn how to use hand lettering practice sheets in Procreate? This tutorial will teach you how.
If you’ve been reading my blog for a while, you know that I am slightly obsessed with hand lettering. Once I got an iPad a few years ago, that obsession grew. Although I still like to sit down with a pen and paper, hand lettering on the iPad is a game changer. I love that with one tap of a button, mistakes can be erased and different color options can be chosen. If you have never used an iPad to letter before, you may be wondering how it all works. Using lettering practice sheets in Procreate is easy. Here’s how to do it.
SUPPLIES FOR DIGITAL LETTERING
For digital lettering, you’ll need an iPad, the Apple Pencil, and the Procreate app. I recommend the Apple Pencil because it is pressure-sensitive. This pressure sensitivity is what allows you to create the thin upstrokes and thick downstrokes of traditional calligraphy. The thickness of the line will depend on the amount of pressure that you use.
HOW TO ACCESS LETTERING PRACTICE SHEETS
You’ll need to first grab some practice sheets. Don’t worry…I’ve got a big collection of free hand lettering worksheets in my resource library All you need to do to access these worksheets is sign up for my email list in the form at the bottom of this post. Once you sign up, you’ll be sent an email that contains a link to the resource library and a password. Simply enter the password and you’re in. Once you have access to the resource library, all the lettering practice sheets are located in the Hand Lettering Practice Sheets section.
I suggest starting with the 8 basic strokes practice sheet and then moving on to the alphabet worksheet pages. I have worksheets for both uppercase letters and lowercase letters and also themed worksheets.
HOW TO USE HAND LETTERING PRACTICE SHEETS IN PROCREATE
Once you have located a brush lettering practice sheet that you want to use, there are a few ways to download it onto your iPad.
- Download it to the Files App.
- Take a screenshot of the practice sheet and it will be saved in PHOTOS.
The method that you use to download the file will depend on how the files are packaged. If the file that you are downloading is a zip file, you’ll need to download the folder to the Files App and then tap on the zip folder to unzip the file. If the file is not a zip file, you can either download it to the Files app or take a screenshot and save it to PHOTOS.
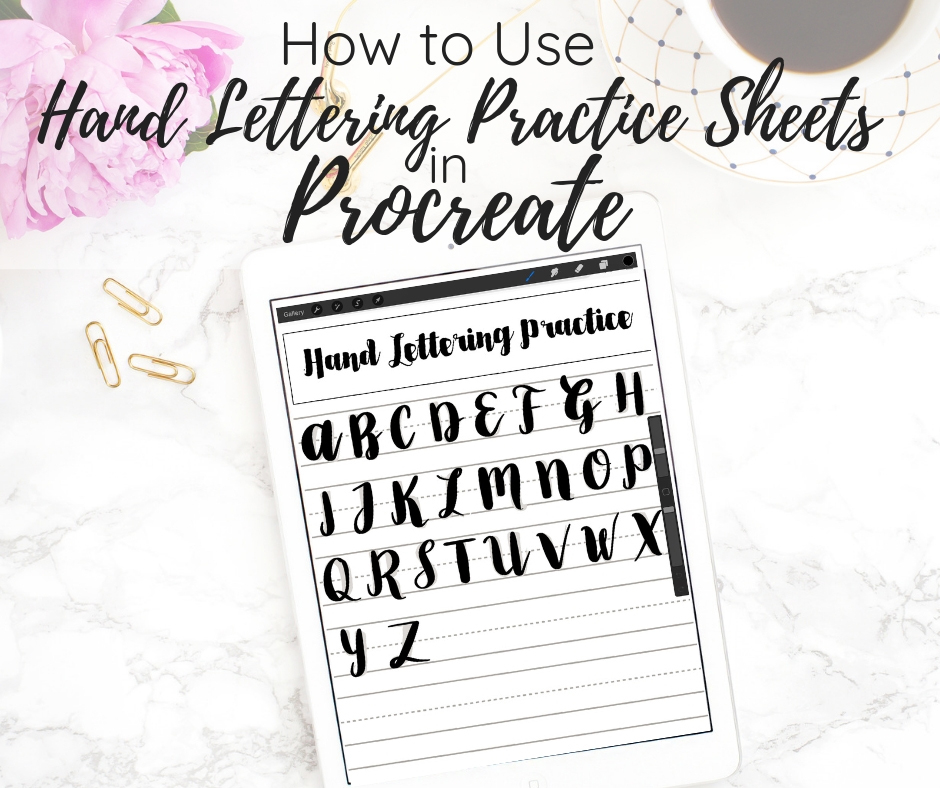
Now that you have the hand lettering practice worksheets on your iPad, open the Procreate app and create a new canvas by tapping the “+” symbol in the upper right
In the upper left corner, tap the wrench icon, tap “Add”, then tap “insert a file” or “insert photo” depending on how you saved the practice sheet. Navigate to the file/photo that you saved and tap it. It now shows up as a new layer in your canvas.

Next, create a new layer. This is the layer that you will be lettering on. It is important to create a new layer so you don’t disturb the actual worksheet. To make a new layer, tap the layers icon and then tap the “+”.

Open the brush library by tapping on the brush icon and scroll down to the Calligraphy brush set. This is a default set that comes free with Procreate. I like the script brush or the brush pen in the calligraphy set but if you have a favorite brush, feel free to use it! Both of these brushes will give you thin upstrokes and thick downstrokes.
IPAD BRUSH LETTERING FOR BEGINNERS COURSE
Create beautiful iPad lettering, even if you’ve never picked up an Apple Pencil

After you have chosen your brush, it’s time to start practicing. Trace the letters, applying heavier pressure on the downstrokes and lighter pressure on the upstrokes. If you learn better via video, you’ll want to watch this one on the 8 basic strokes.
If your lettering practice sheet has thinner letters than what is shown below, you can adjust the size of your brush using the slider on the right-hand side of the screen.
If you run out of room, simply add a new layer and toggle off the layer that you are currently working on. Now you have a brand new layer to letter on. Keep all your layers and toggle them on and off to see your progress.

MORE PROCREATE TUTORIALS
- How to Create Color Palettes in Procreate
- Two Ways to Overlay Lettering onto Photos using Procreate
- How to Draw 70s Style Lettering in Procreate
- How to Create SVG Files using Procreate
- How to Draw 3D Lettering in Procreate
- How to Create Blended Backgrounds in Procreate
- How to Install Brushes into Procreate
- How to Create Rainbow Lettering in Procreate
- How to Create Watercolor Brush Lettering in Procreate

LOVE IT? PIN IT!
Thanks so much
THANK YOU FOR THE FREE LETTERING SHEETS AND HOW TO GUIDE.
You’re welcome!