
How to Create a Brush in Procreate
Learn how to create a brush in Procreate and open up a whole new world of digital design.
Have you seen all the amazing brushes that are available for the Procreate app? From lettering brushes to illustration brushes to everything in between, it is simply amazing what you can create with this app. Do you ever wonder how to create a custom brush? It’s really not as hard as you think. With a few simple tweaks, you can create your own brush in Procreate in just minutes. Today I’m going to show you how to create a simple flower brush. The steps to create this brush can be repeated to create tons more brushes.

BASIC PROCREATE POSTS:
How to Use Procreate: An Intro
How to Hand Letter in Procreate
HOW TO ACCESS THE BRUSH LIBRARY IN PROCREATE
The brush library is located in the upper right of the screen, once you create a new canvas in Procreate. The icon looks like a paintbrush and all you have to do is tap on the icon to bring up the brush library. Procreate comes with a LOT of default brushes and you can definitely create tons of artwork just with the default brushes. But sometimes you may want a custom brush if you are trying to achieve an effect and can’t find a specific brush in the library that will give you that effect.
HOW TO CREATE A BRUSH IN PROCREATE
You can create pretty much any type of brush in Procreate. If you can dream it up, you can create it. All it takes is just some setting tweaks. Today I’m going to go over how to create a flower brush in Procreate. This is a brush that is not included in the brush library and it is an easy beginner brush to make.
- Open the brush library and navigate to the monoline brush in the calligraphy brush set. This is a basic brush that I start with whenever creating a new brush.

- Swipe left on the brush and tap duplicate. This creates a copy of the brush. You will adjust the settings of this copy to create your new brush.
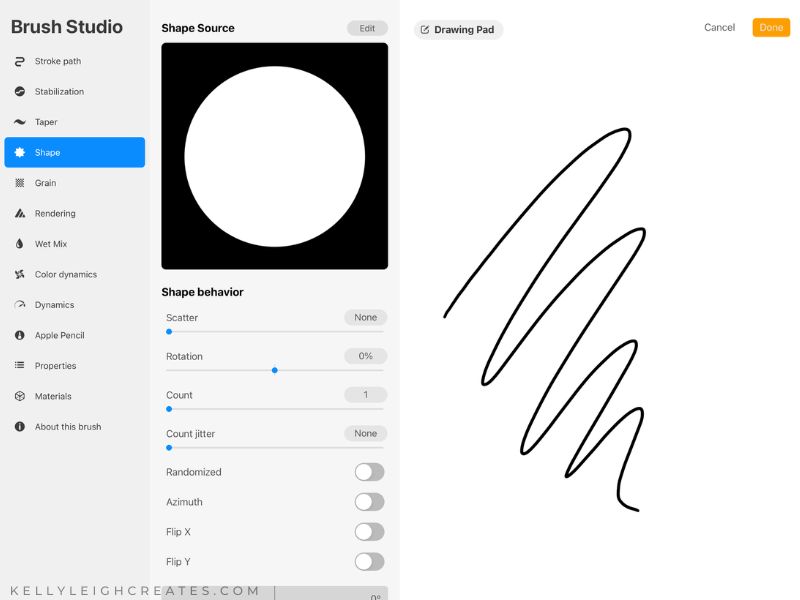
- Tap the brush to open the brush settings. This panel may look confusing but don’t worry. There are a lot of settings that you can change but we are only going to focus on Stroke Path, Shape, and Properties.
- The drawing pad is on the right of the screen and the settings are on the left. When you adjust the settings, you can see the changes to your brush in real-time. This makes it very easy to fine-tune your brush.
- The first thing we’re going to do is change the shape of the brush from round to a flower. Tap on “Shape” on the left-hand side. This brings up the shape source library. Tap EDIT next to “Shape Source”. Scroll till you find the flower and tap on it. Then tap DONE twice. You have just changed the shape of the brush from a round monoline brush to a flower.
- Next, we’re going to adjust the spacing of the flowers. Tap on “Stroke Path” and adjust the spacing and jitter sliders until you get the effect that you want. Spacing controls the space between each shape and jitter controls the distance of the shape from the center axis of the line. I set my spacing to 70% and jitter to none.
- The last setting we’re going to change is under “Properties”. Adjust the maximum and minimum size of the brush with the slider until you get the results that you want. I set the minimum at 1% and the max to 50%. When you are finished, tap DONE.
- When you are happy with the results, the last thing to do is name the brush. Tap “About this brush” to name it. You can also upload your logo and add your name/business name under “Made By” if you are planning to sell the brush.

 Tap EDIT next to “Shape Source”. Scroll till you find the flower and tap on it. Then tap DONE twice. You have just changed the shape of the brush from a round monoline brush to a flower.


And that’s it! You’ve just created your very own custom Procreate brush. The amount of brushes you can create is limitless. Play around with the shape source library and the settings to create more unique brushes!


MORE PROCREATE TUTORIALS
- How to Create Color Palettes in Procreate
- How to Make a Stamp Brush in Procreate
- How to Organize Procreate Files with Stacks
- How to Use Masks in Procreate
- Two Ways to Overlay Lettering onto Photos using Procreate
- How to Draw 70s Style Lettering in Procreate
- How to Create SVG Files using Procreate
- How to Draw 3D Lettering in Procreate
- How to Create Blended Backgrounds in Procreate
- How to Install Brushes into Procreate
- How to Create Rainbow Lettering in Procreate
- How to Create Watercolor Brush Lettering in Procreate